GCP
gcloud auth
list : 활성 계정 목록 표시configure-docker us-central1-docker.pkg.dev : us-central1 리전의 docker 저장소 인증 설정
gcloud config
list project : 프로젝트 목록 표시set compute/region assigned_at_lab_start : 컴퓨팅 리전 설정set compute/zone assigned_at_lab_start : 컴퓨팅 영역(리전 내 대략적 위치) 설정
GKE 명령어
gcloud container clusters create --machine-type=e2-medium --zone=assigned_at_lab_start lab-cluster
1
2
3
4
5
6
7
8
| NAME: lab-cluster
LOCATION: assigned_at_lab_start
MASTER_VERSION: 1.22.8-gke.202
MASTER_IP: 34.67.240.12
MACHINE_TYPE: e2-medium
NODE_VERSION: 1.22.8-gke.202
NUM_NODES: 3
STATUS: RUNNING
|
gcloud container clusters get-credentials lab-cluster : 사용자 인증 정보로 lab-cluster에 인증 후 상호작용 시작kubectl create deployment hello-server --image=gcr.io/google-samples/hello-app:1.0 : hello-app 이미지로 새 deployment hello-server 생성
--image 옵션은 Container Registry 버킷에서 이미지를 가져옴- 버전이 지정되지 않은 경우 latest가 사용됨
kubectl expose deployment hello-server --type LoadBalancer --port 8080 : service 객체 생성
--port : 컨테이너가 노출될 포트 지정--type=LoadBalancer : 컨테이너의 Compute Engine 로드밸런서 생성
kubectl get service : 서비스 정보 가져옴
1
2
3
| NAME TYPE CLUSTER-IP EXTERNAL-IP PORT(S) AGE
hello-server loadBalancer 10.39.244.36 35.202.234.26 8080:31991/TCP 65s
kubernetes ClusterIP 10.39.240.1 433/TCP 5m13s
|
- EXTERNAL-IP는 생성까지 조금 걸릴 수 있음
gcloud container clusters delete lab-cluster : lab-cluster 삭제
파드
kubectl get pods : 파드 정보 가져옴
1
2
3
4
5
6
7
8
9
10
11
12
13
14
15
16
17
18
19
20
21
22
23
| apiVersion: v1
kind: Pod
metadata:
name: monolith
labels:
app: monolith
spec:
containers:
- name: monolith
image: kelseyhightower/monolith:1.0.0
args:
- "-http=0.0.0.0:80"
- "-health=0.0.0.0:81"
- "-secret=secret"
ports:
- name: http
containerPort: 80
- name: health
containerPort: 81
resources:
limits:
cpu: 0.2
memory: "10Mi"
|
kubectl create -f pods/monolith.yaml로 파드 생성kubectl describe pods monolith : 파드 정보 출력kubectl port-forward monolith 10080:80 : monolith 파드의 80번 포트와 로컬 10080 포트를 바인드
1
2
3
4
5
6
| curl -u user http://127.0.0.1:10080/login
// 'password' 입력 -> JWT 토큰 출력
TOKEN=$(curl http://127.0.0.1:10080/login -u user|jq -r '.token')
// 'password' 입력 -> JWT 토큰 복사
curl -H "authorization: Bearer $TOKEN"
http://127.0.0.1:10080/secure
|
kubectl logs -f monolith : 실시간 로그 스트림 출력kubectl exec monolith --stdin --tty -c monolith /bin/sh : 파드의 대화형 쉘 실행
1
2
3
4
5
6
7
8
9
10
11
12
13
14
| kind: Service
apiVersion: v1
metadata:
name: "monolith"
spec:
selector:
app: "monolith"
secure: "enabled"
ports:
- protocol: "TCP"
port: 443
targetPort: 443
nodePort: 31000
type: NodePort
|
- https를 처리할 수 있는 파드
- 433 포트의 nginx로 트래픽을 전달하기 위해 nodeport 31000을 노출시켜야 함
gcloud compute firewall-rules create allow-monolith-nodeport --allow=tcp:31000 : tcp 트래픽을 31000 포트로 보내는 룰 추가gcloud compute instances list : 인스턴스 리스트 출력kubectl get pods -l "app=monolith" : 라벨이 붙은 파드 목록 출력kubectl label pods secure-monolith 'secure=enabled' : pod에 라벨 추가kubectl describe services monolith | grep Endpoints : 엔드포인트 조회
Deployment
kubectl explain deployment.metadata.name : 배포 객체의 구조, 개별 필드 기능 출력kubectl scale deployment hello --replicas=5 : replicas 필드 업데이트kubectl edit deployment hello : hello deployment 업데이트
kubectl rollout history deployment/hello : hello deployment 히스토리 출력
pause, resume, undo, state 등의 명령어도 있음
- 파드에 적용된 이미지 확인
1
| kubectl get pods -o jsonpath --template='{range .items[*]}{.metadata.name}{"\t"}{"\t"}{.spec.containers[0].image}{"\n"}{end}'
|
배포 방식 설정 방법
-
.spec.strategy.type
.spec.template.metadata.labels
- Canary :
track: canary 설정
1
2
3
4
5
6
7
8
9
10
11
12
13
14
15
16
17
18
19
20
21
22
23
24
25
| apiVersion: apps/v1
kind: Deployment
metadata:
name: hello-canary
spec:
replicas: 1
selector:
matchLabels:
app: hello
template:
metadata:
labels:
app: hello
track: canary
# 2.0.0 버전을 사용하여 서비스 선택기의 버전과 일치시킵니다
version: 2.0.0
spec:
containers:
- name: hello
image: kelseyhightower/hello:2.0.0
ports:
- name: http
containerPort: 80
- name: health
containerPort: 81
|
kubectl create -f deployments/hello-canary.yaml을 실행해 hello, hello-canary 두 가지의 배포를 만듦hello 서비스에서는 app: hello selector가 적용된 hello, hello-canary 모두에 대해 로드밸런싱 실행됨
hello-canary의 파드 수가 더 적기 때문에 자동으로 비율이 조절됨
- Blue-green :
app, version 설정
1
2
3
4
5
6
7
8
9
10
11
12
13
14
15
16
17
18
19
20
21
22
23
24
25
26
27
28
29
30
31
32
33
34
35
36
37
38
39
40
41
42
43
| apiVersion: apps/v1
kind: Deployment
metadata:
name: hello-green
spec:
replicas: 3
selector:
matchLabels:
app: hello
template:
metadata:
labels:
app: hello
track: stable
version: 2.0.0
spec:
containers:
- name: hello
image: kelseyhightower/hello:2.0.0
ports:
- name: http
containerPort: 80
- name: health
containerPort: 81
resources:
limits:
cpu: 0.2
memory: 10Mi
livenessProbe:
httpGet:
path: /healthz
port: 81
scheme: HTTP
initialDelaySeconds: 5
periodSeconds: 15
timeoutSeconds: 5
readinessProbe:
httpGet:
path: /readiness
port: 81
scheme: HTTP
initialDelaySeconds: 5
timeoutSeconds: 1
|
hello-green 배포를 먼저 만들어놓고 kubectl apply -f services/hello-green.yaml으로 한 번에 전환
hello-green.yaml 파일은 type: Deployment인데 services에도 바로 사용이 가능한가??
- blue 배포가 실행 중일 경우
kubectl apply -f services/hello-blue.yaml으로 롤백 가능
.spec.sessionAffinity
- 세션 어피니티 : 동일한 사용자에게 동일한 버전을 제공
```yaml
kind: Service
apiVersion: v1
metadata:
name: “hello”
spec:
sessionAffinity: ClientIP
selector:
app: “hello”
ports:
- protocol: “TCP”
port: 80
targetPort: 80
```
Jenkins 연동
- Helm
- microservice들을 배포하기 위해 각자 yaml 파일을 만들어야 함
- 이때 공통 구조를 heml chart로 저장해두고 안에 들어가는 value만
values.yaml으로 작성하고 helm을 통해 적용(value injection) 후 배포 가능
values.yaml 사용 : helm install -f values.yaml -f override.yaml myredis ./redis--set 플래그 사용 : helm install --set name=prod myredis ./redis
1
2
3
4
5
6
7
8
9
10
11
12
13
14
15
16
17
18
19
20
21
22
23
24
25
26
27
28
29
30
31
32
33
34
35
36
37
38
39
40
41
42
43
44
45
46
47
48
49
50
51
52
53
54
55
56
57
58
59
60
61
62
63
64
65
66
67
68
69
70
71
72
| # 클러스터 프로비저닝
gcloud container clusters create jenkins-cd \
--num-nodes 2 \
--machine-type e2-standard-2 \
--scopes "https://www.googleapis.com/auth/source.read_write,cloud-platform"
# 클러스터 실행 확인
gcloud container clusters list
# 클러스터 사용자 인증 정보 가져옴
gcloud container clusters get-credentials jenkins-cd
# 클러스터 연결 확인
kubectl cluster-info
# Helm 차트 저장소 추가
helm repo add jenkins https://charts.jenkins.io
# 저장소 최신 상태 유지
helm repo update
# jenkins 저장소의 values.yaml 설정으로 차트 배포
helm install cd jenkins/jenkins -f jenkins/values.yaml --wait
# jenkins 파드 실행 확인
kubectl get pods
# jenkins 서비스 계정 구성
kubectl create clusterrolebinding jenkins-deploy --clusterrole=cluster-admin --serviceaccount=default:cd-jenkins
# cloud shell에서 jenkins UI로 포트 포워딩 설정
export POD_NAME=$(kubectl get pods --namespace default -l "app.kubernetes.io/component=jenkins-master" -l "app.kubernetes.io/instance=cd" -o jsonpath="{.items[0].metadata.name}")
kubectl port-forward $POD_NAME 8080:8080 >> /dev/null &
# jenkins 서비스 생성 확인
kubectl get svc
# jenkins 차트에서 자동으로 생성한 관리자 비밀번호 확인
printf $(kubectl get secret cd-jenkins -o jsonpath="{.data.jenkins-admin-password}" | base64 --decode);echo
# cloud shell - 웹 미리보기 - Preview on port 8080에서 (admin, [PW])으로 로그인
# 네임스페이스를 통해 배포를 격리
kubectl create ns production
# production, canary 배포 생성 및 서비스 생성
kubectl apply -f k8s/production -n production
kubectl apply -f k8s/canary -n production
kubectl apply -f k8s/services -n production
# production frontend replica 조절
kubectl scale deployment gceme-frontend-production -n production --replicas 4
# 적용된 것 확인
kubectl get pods -n production -l app=gceme -l role=frontend
kubectl get pods -n production -l app=gceme -l role=backend
# production의 외부 IP 검색 및 확인
kubectl get service gceme-frontend -n production
# frontend 서비스 로드밸런스 IP 저장
export FRONTEND_SERVICE_IP=$(kubectl get -o jsonpath="{.status.loadBalancer.ingress[0].ip}" --namespace=production services gceme-frontend)
# 서비스 버전 확인
curl http://$FRONTEND_SERVICE_IP/version
# 앱 복사본 만들고 registry로 푸시
gcloud source repos create default
git init
git config credential.helper gcloud.sh
git remote add origin https://source.developers.google.com/p/$DEVSHELL_PROJECT_ID/r/default
# 이후 깃 설정 후 푸시
|
- 서비스 계정 사용자 인증 정보 추가
- Jenkins가 Cloud Source Repositories에서 코드를 다운로드할 때 사용
- Jenkins 웹페이지에서 Manage Jenkins - Manage Credentials - System - Global credentials (unrestricted) - Add Credentials
- Kind : Google Service Account from metadata
- 이름 :
Project ID
- Kubernetes용 Jenkins Cloud 구성
- Manage Jenkins - Manage nodes and cloud - Configure Clouds - Add a new cloud - Kubernetes - Kubernetes Cloud Details
- Jenkins URL :
http://cd-jenkins:8080
- Jenkins tunnel :
cd-jenkins-agent:50000
- Jenkins 작업 만들기
- Dashboard - New Item - MultibranchPipeline
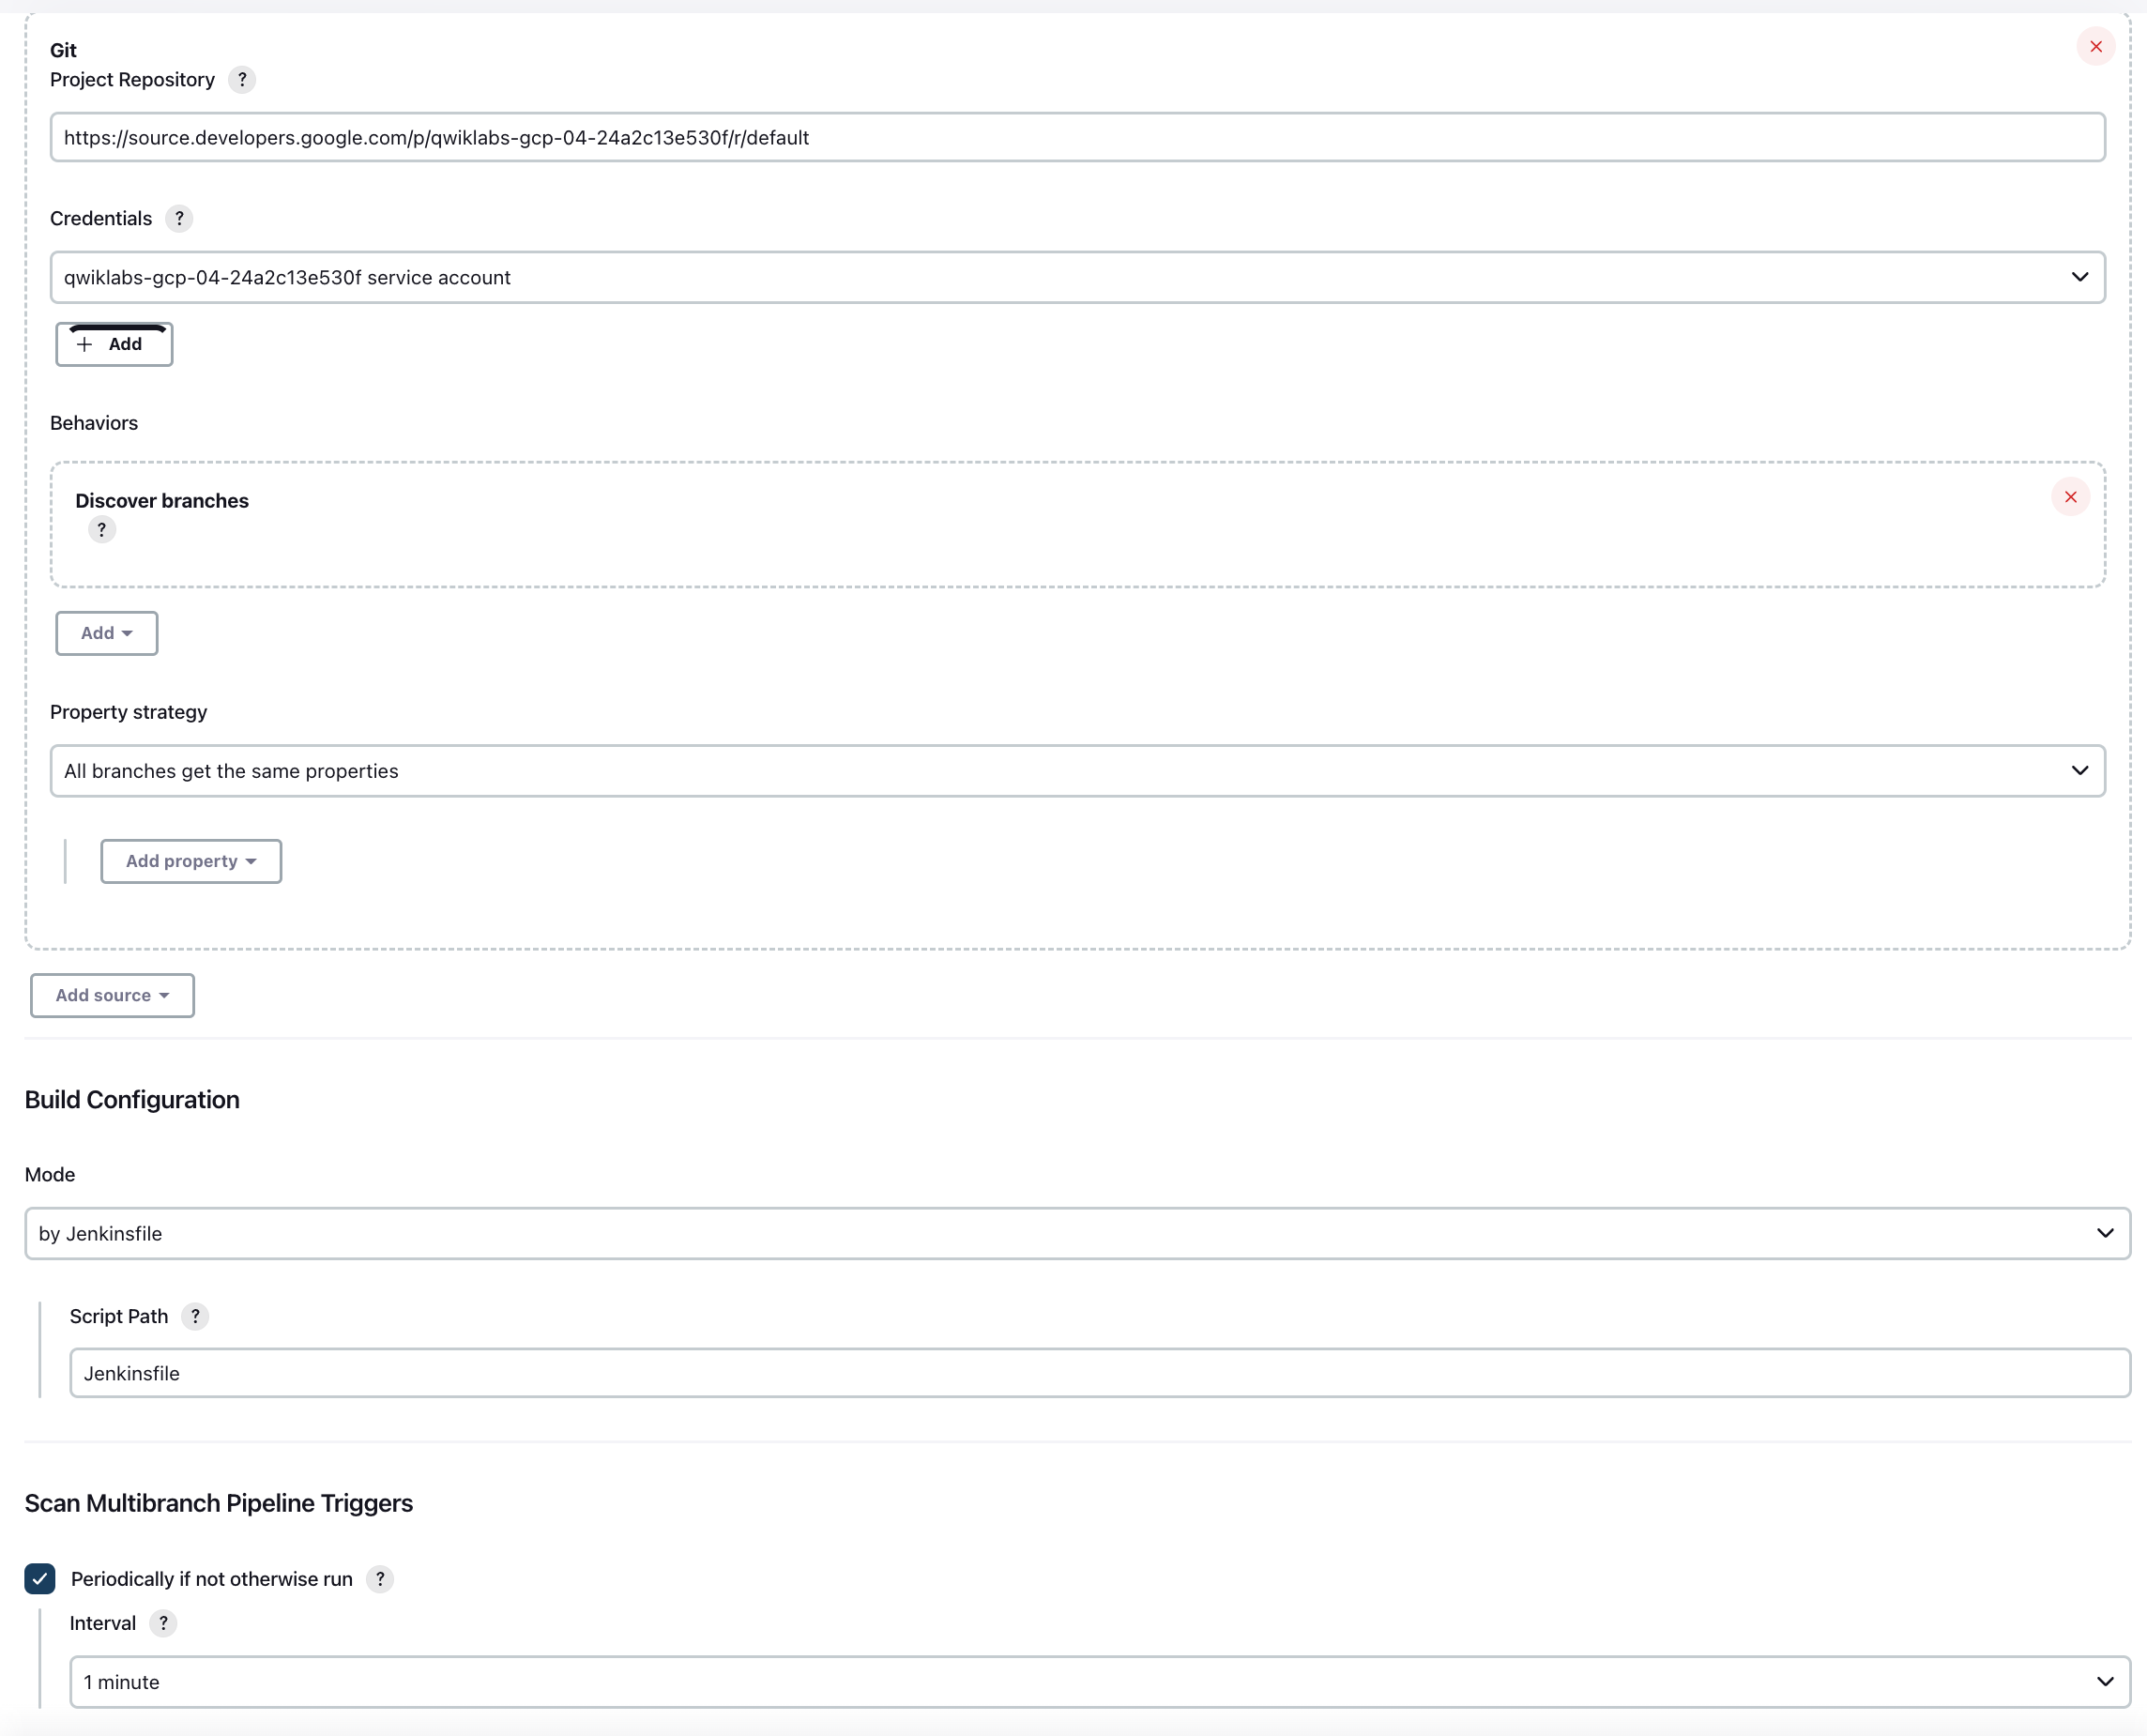
- Branch Sources - Add Source : Git
- Project Repository : Cloud Source Repositories - sample-app - HTTPS clone URL
- 사용자 인증 정보 : 위에서 만든 사용자 인증 정보
- Scan Multibranch Pipeline Triggers : Periodically if not otherwise run(Interval : 1분)

- Jenkinsfile 작성 및 배포
1
2
3
4
5
6
7
| PROJECT = "REPLACE_WITH_YOUR_PROJECT_ID"
APP_NAME = "gceme"
FE_SVC_NAME = "${APP_NAME}-frontend"
CLUSTER = "jenkins-cd"
CLUSTER_ZONE = ""
IMAGE_TAG = "gcr.io/${PROJECT}/${APP_NAME}:${env.BRANCH_NAME}.${env.BUILD_NUMBER}"
JENKINS_CRED = "${PROJECT}"
|
- 알맞게 수정 후 새로운 브랜치로 푸시
kubectl proxy &으로 프록시 시작curl http://localhost:8001/api/v1/namespaces/new-feature/services/gceme-frontend:80/proxy/version : 로컬 호스트로 요청 보내서 kubectl 프록시에서 전달하는지 확인
-
카나리 배포
1
2
3
4
| export FRONTEND_SERVICE_IP=$(kubectl get -o \
jsonpath="{.status.loadBalancer.ingress[0].ip}" --namespace=production services gceme-frontend)
while true; do curl http://$FRONTEND_SERVICE_IP/version; sleep 1; done
|
- 버전 2.0.0 확인되면 마스터 머지 후 배포
GKE 개념
- GKE : Kubernetes 객체를 사용하여 클러스터 리소스를 만들고 관리
deployment 객체를 사용해 stateless 앱 배포
- 한 파드가 종료될 경우 deployment 객체가 스스로 파드를 만들고 실행 가능한 다른 노드에서 실행되게 설정함 → replicas 수 유지
service 객체를 사용하여 앱에 액세스하기 위한 규칙, 부하 분산 방식 정의
- 클러스터 : 1개 이상의 클러스터 마스터, 노드(작업자)로 구성됨
- 노드 : Kubernetes 프로세스를 실행하는 인스턴스
- 클러스터 이름은 영문자로 시작하고 영숫자로 끝나야 하고 40자 이하여야 함
- 파드 : 1개 이상의 컨테이너가 포함된 모음
- 보통 상호 의존성이 높은 컨테이너들을 하나의 파드에 패키징함(프, 백 등)
- 볼륨 : 파드에 포함되는 데이터 디스크
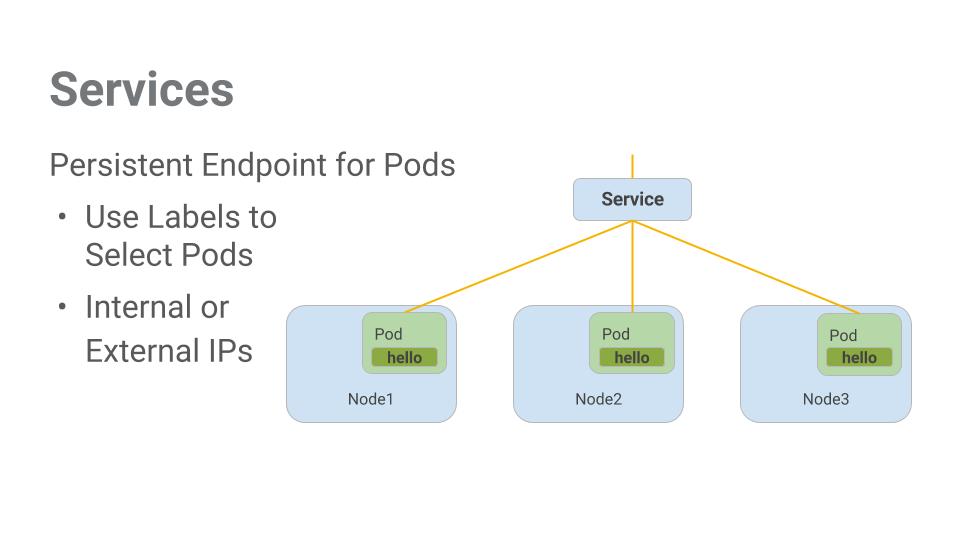
- 서비스 : 파드를 위한 엔드포인트 제공

- 파드 집합에 대한 액세스 수준
ClusterIP : 클러스터 내부에서만 볼 수 있음, 기본 유형NodePort : 클러스터의 각 노드에 외부에서 접근 가능한 IP 주소 제공LoadBalancer : LB를 추가하며 유입되는 트래픽을 내부 노드로 전달


Leave a comment