
Spring Boot와 AWS로 혼자 구현하는 웹 서비스 4 - Spring Security, OAuth 2.0으로 로그인 구현(Ch.05)
- Authentication : 인증, 로그인
Authorization : 권한 부여 - Spring MVC request lifecycle
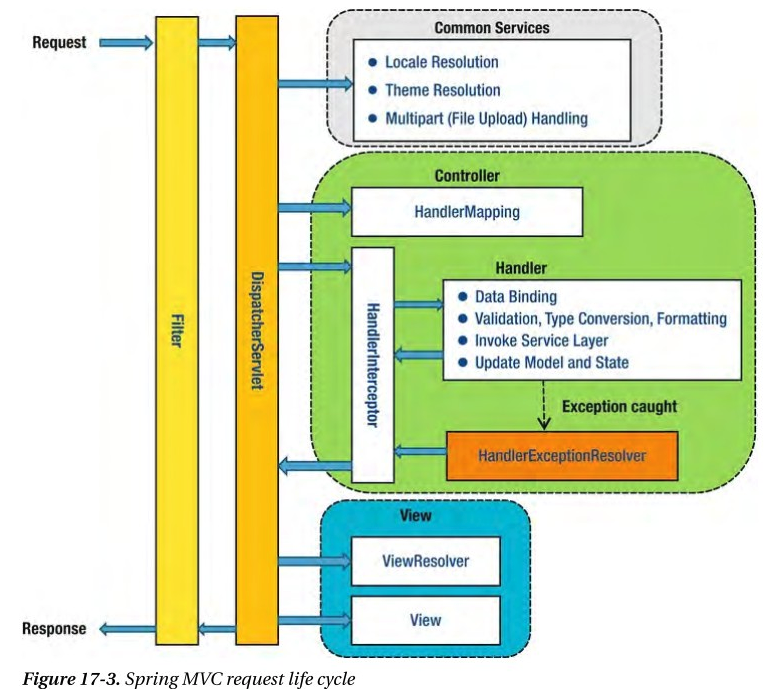
- Spring Interceptor : DispatcherServlet에서 Handler로 가기 전에 정보를 처리
- Spring에서 자체 제공하는 기능
- 인증, 권한같은 작업을 주로 담당
- Filter : DispatcherServlet의 앞단에서 정보를 처리
- J2EE 표준에 정의되어 있는 기능
- 인코딩, 보안과 같이 web app 전역적으로 처리해야 하는 작업 담당
- Spring Interceptor : DispatcherServlet에서 Handler로 가기 전에 정보를 처리
- Spring에서는 Spring Security를 통해 보안 기능을 구현하는 것을 권장함
- OAuth(Open Authorization) : 접근 위임을 위한 open standard
- 사용자들이 비밀번호를 제공하지 않고, 다른 웹사이트 상의 자신의 정보에 대해 앱의 접근 권한을 부여하기 위한 수단
e.g. 구글 계정에 대한 접근 권한을 부여해줌
- 사용자들이 비밀번호를 제공하지 않고, 다른 웹사이트 상의 자신의 정보에 대해 앱의 접근 권한을 부여하기 위한 수단
Spring Security와 Spring Security Oauth2 클라이언트
- 인증이 매우 복잡한 과정이기 때문에 대부분은 소셜 로그인 기능을 사용함
- OAuth를 사용할 경우 로그인 보안, 본인 인증, pw 찾기/변경, 회원정보 변경 등의 기능을 직접 개발하지 않아도 됨
- Spring Boot 1.5, 2.0에서의 OAuth2 연동 방법이 바뀌었지만, spring-security-oauth2-autocnfigure 라이브러리를 사용해서 1.5에서 사용하던 설정을 2.0에서도 그대로 사용 가능
- 예제에서는
spring-security-oauth2-client라이브러리를 사용할 예정- 1.5에서 사용하던
spring-security-oauth는 maintenance mode로 바뀌어, 신규 기능은 추가되지 않음 spring-security-oauth2-client는 springboot용 starter 라이브러리가 존재함
- 1.5에서 사용하던
- Spring Boot 1.5, 2.0 설정 차이
- client 정보가
google-client에 바로 존재하면 1.5,google-security-oauth2-client에 존재하면 2.0 - 1.5에서는 url을 모두 명시해야 하지만, 2.0에서는 client 인증 정보만 입력하면 됨
- 2.0에서는
CommonOAuth2Provider라는 enum을 통해 구글, 깃헙, 페이스북 등의 기본 설정값을 제공함(다른 사이트들은 직접 추가해줘야 함)
- client 정보가
구글 서비스 등록
- google cloud console에서 프로젝트 생성 후 API 및 서비스 - 사용자 인증 정보 - 사용자 인증 정보 만들기 - OAuth 클라이언트 ID 만들기 - 동의 화면 구성
- 범위 : 외부
- 테스트 사용자 등록
- 다시 OAuth 클라이언트 ID 만들기 - 웹앱 - 승인된 리디렉션 URI :
http://localhost:8080/login/oauth2/code/google으로 설정- 서비스에서 준 인증 정보로 인증이 성공하면 구글에서 redirect할 URL
- spring boot 2의 security에서는 기본적으로
{domain}/login/oauth2/code/{socialservice}로 redirect URL을 지원함 - redirect URL에 대한 controller는 security에서 이미 구현함
- AWS에 배포하면 localhost 이외의 주소를 추가해야 함
src/main/resources에application-oauth.properties생성 후 clientId, clientSecret 등록1 2 3
spring.security.oauth2.client.registration.google.client-id= // CLIENTID spring.security.oauth2.client.registration.google.client-secret= // CLIENTSECRET spring.security.oauth2.client.registration.google.scope=profile,email
- scope 설정의 경우 기본값이
openid,profile,email임openidscope가 있으면 Open Id Provider로 인식하고, OpenId Provider 서비스(구글)과 나머지(네이버, 카카오 등) 각각에 대해 OAuth2Service를 만들어야 함- 예제에서는 하나만 만들기 위해 저렇게 범위를 지정해줌
- 스프링 부트에서는
application-prop.properties파일을 생성해서profile=prop과 같이 호출하면 해당 프로퍼티의 설정들을 가져올 수 있음
- scope 설정의 경우 기본값이
application.properties에spring.profiles.include=oauth추가.gitignore에application-oauth.properties추가
구글 로그인 연동
-
domain.user패키지 생성 후User클래스 생성1 2 3 4 5 6 7 8 9 10 11 12 13 14 15 16 17 18 19 20 21 22 23 24 25 26 27 28 29 30 31 32 33 34 35 36 37 38 39 40 41
@Getter @NoArgsConstructor @Entity public class User extends BaseTimeEntity { @Id @GeneratedValue(strategy = GenerationType.IDENTITY) private Long id; @Column(nullable = false) private String name; @Column(nullable = false) private String email; @Column private String picture; @Enumerated(EnumType.STRING) @Column(nullable = false) private Role role; @Builder public User(String name, String email, String picture, Role role) { this.name = name; this.email = email; this.picture = picture; this.role = role; } public User update(String name, String picture) { this.name = name; this.picture = picture; return this; } public String getRoleKey() { return this.role.getKey(); } }
@Enumerated(EnumTypes.STRING): enum의 타입 지정(역할의 의미를 담기 위해 문자열로 설정)
-
user패키지 안에 enumRole생성1 2 3 4 5 6 7 8 9 10
@Getter @RequiredArgsConstructor public enum Role { GUEST("ROLE_GUEST", "guest"), USER("ROLE_USER", "user"); private final String key; private final String title; }
- Spring Security에는 권한 코드에 항상
ROLE_가 붙어야 함
- Spring Security에는 권한 코드에 항상
-
user패키지에 interfaceUserRepository추가1 2 3 4
public interface UserRepository extends JpaRepository<User, Long> { Optional<User> findByEmail(String email); }
User의 CRUD을 정의findByEmail: 이미 등록된 사용자인지 email으로 판단하기 위해 구현
Spring Security 설정
build.gradle에compile org.springframework.boot:spring-boot-starter-oauth2-client'의존성 추가- client의 소셜 기능(소셜 로그인 등) 구현 시 필요함
-
springaws.config.auth패키지 생성 후SecurityConfig클래스 생성1 2 3 4 5 6 7 8 9 10 11 12 13 14 15 16 17 18 19 20 21 22 23 24
@RequiredArgsConstructor @EnableWebSecurity public class SecurityConfig extends WebSecurityConfigurerAdapter { private final CustomOAuth2UserService customOAuth2UserService; @Override protected void configure(HttpSecurity http) throws Exception { http.csrf().disable() .headers().frameOptions().disable() .and() .authorizeRequests() .antMatchers("/", "/css/**", "/images/**", "/js/**", "/h2-console/**").permitAll() .antMatchers("/api/v1/**").hasRole(Role.USER.name()) .anyRequest().authenticated() .and() .logout() .logoutSuccessUrl("/") .and() .oauth2Login() .userInfoEndpoint() .userService(customOAuth2UserService); } }
@EnableWebSecurity: spring security 설정 활성화csrf().disable().headers().frameOptions().disable(): h2-console 화면을 사용하기 위해 비활성화해줌authorizeRequests: URL별 권한 관리를 설정의 진입점authorizeRequests를 선언 후andMatchers옵션 사용 가능
andMatchers: 권한 관리 대상을 지정하는 옵션- URL, HTTP 메소드별로 관리 가능
"/"와 같은 지정된 URL들은permitAll()으로 전체 열람 권한 부여"/api/v1/**"과 같은 API는USER권한을 가진 사람만 열람 가능하도록 권한 부여
anyRequest().authenticated(): 설정된 값 이외의 나머지 URL은 인증된 사용자만 허용하도록 권한 부여logout().logoutSuccessUrl("/"): 로그아웃 성공 시/주소로 이동oauth2Login(): OAuth2 로그인 기능에 대한 설정의 진입점userInfoEndpoint: 로그인 성공 이후 사용자 정보를 가져올 때 설정 담당
userService(): 소셜 로그인 성공 이후의 작업들 위한UserServiceinterface이 구현체를 등록함- 리소스 서버(소셜 서비스들)에서 유저 정보를 가져온 상태에서 추가로 진행할 기능을 명시할 수 있음
-
config.auth패키지에CustomOAuth2UserService클래스 생성1 2 3 4 5 6 7 8 9 10 11 12 13 14 15 16 17 18 19 20 21 22 23 24 25 26 27 28 29 30 31 32 33 34
@RequiredArgsConstructor @Service public class CustomOAuth2UserService implements OAuth2UserService<OAuth2UserRequest, OAuth2User> { private final UserRepository userRepository; private final HttpSession httpSession; @Override public OAuth2User loadUser(OAuth2UserRequest userRequest) throws OAuth2AuthenticationException { OAuth2UserService<OAuth2UserRequest, OAuth2User> delegate = new DefaultOAuth2UserService(); OAuth2User oAuth2User = delegate.loadUser(userRequest); String registrationId = userRequest.getClientRegistration().getRegistrationId(); String userNameAttributeName = userRequest.getClientRegistration().getProviderDetails() .getUserInfoEndpoint().getUserNameAttributeName(); OAuthAttributes attributes = OAuthAttributes.of(registrationId, userNameAttributeName, oAuth2User.getAttributes()); User user = saveOrUpdate(attributes); httpSession.setAttribute("user", new SessionUser(user)); return new DefaultOAuth2User(Collections.singleton(new SimpleGrantedAuthority(user.getRoleKey())), attributes.getAttributes(), attributes.getNameAttributeKey()); } private User saveOrupdate(OAuthAttributes attributes) { User user = userRepository.findByEmail(attributes.getEmail()) .map(entity -> entity.update(attributes.getName(), attributes.getPicture())) .orElse(attributes.toEntity()); return userRepository.save(user); } }
registrationId: 현재 로그인 진행 중인 서비스(구글, 네이버, …)를 구분userNameAttributeName: OAuth2 로그인 진행할 때 키가 되는 필드값- PK와 같은 의미임
- 구글의 기본코드 :
"sub"
네이버, 카카오는 기본으로 지원하지 않음
OAuthAttributes:OAuth2UserService를 통해 가져온OAuth2User의 attribute를 담을 클래스SessionUser: 세션에 사용자 정보를 저장하기 위한 Dto 클래스User클래스의 직렬화(Serialization)을 구현하지 않았기 때문에 바로 http session에 저장하려고 하면 에러가 남User클래스는 entity이기 때문에 자식 엔티티를 가지게 된다면, 자식들까지 직렬화 대상에 포함되면서 성능 이슈가 발생할 수 있음
→ 세션에 집어넣기 위해 직렬화 기능을 가진 세션 Dto를 따로 만드는게 나음
-
auth.dto패키지 생성 후OAuthAttributes클래스 생성1 2 3 4 5 6 7 8 9 10 11 12 13 14 15 16 17 18 19 20 21 22 23 24 25 26 27 28 29 30 31 32 33 34 35 36 37 38 39 40 41 42 43 44
@Getter public class OAuthAttributes { private Map<String, Object> attributes; private String nameAttributeKey; private String name; private String email; private String picture; @Builder public OAuthAttributes(Map<String, Object> attributes, String nameAttributeKey, String name, String email, String picture) { this.attributes = attributes; this.nameAttributeKey = nameAttributeKey; this.name = name; this.email = email; this.picture = picture; } public static OAuthAttributes of(String registrationId, String userNameAttributeName, Map<String, Object> attributes) { return ofGoogle(userNameAttributeName, attributes); } private static OAuthAttributes ofGoogle(String userNameAttributeName, Map<String, Object> attributes) { return OAuthAttributes.builder() .name((String) attributes.get("name")) .email((String) attributes.get("email")) .picture((String) attributes.get("picture")) .attributes(attributes) .nameAttributeKey(userNameAttributeName) .build(); } public User toEntity() { return User.builder() .name(name) .email(email) .picture(picture) .role(Role.GUEST) .build(); } }
of():OAuth2User에서 반환하는 값은Map이기 때문에 하나씩 변환해줘야 함toEntity():Userentity 생성- 처음 가입하는 시점에
OAuthAttributes에서 entity를 생성 - 가입할 때 기본 권한을 GUEST로 주기 위해 role의 빌더값으로
Role.GUEST사용
- 처음 가입하는 시점에
-
config.auth.dto패키지에SessionUser클래스 생성1 2 3 4 5 6 7 8 9 10 11 12
@Getter public class SessionUser implements Serializable { private String name; private String email; private String picture; public SessionUser(User user) { this.name = user.getName(); this.email = user.getEmail(); this.picture = user.getPicture(); } }
- 인증된 사용자 정보만 필요하기 때문에
name,email,picture만 필드로 선언
- 인증된 사용자 정보만 필요하기 때문에
로그인 테스트
index.mustache에 로그인 버튼 추가1 2 3 4 5 6 7 8 9 10 11 12
... <div class="col-md-6"> <a href="/posts/save" role="button" class="btn btn-primary">Upload post</a> {{#userName}} Logged in as: <span id="user">{{userName}}</span> <a href="/logout" class="btn btn-info active" role="button">Logout</a> {{/userName}} {{^userName}} <a href="/oauth2/authorization/google" class="btn btn-success active" role="button">Google Login</a> {{/userName}} </div> ...
{{#userName}}:userName이 존재할 경우의 템플릿
{{^userName}}:userName이 존재하지 않을 경우의 템플릿a href="/logout": Spring Security에서 기본으로 제공하는 로그아웃 URL(별도의 controller 필요하지 않음)SecurityConfig클래스에서 URL 변경 가능
a href="/oauth2/authorization/google": 기본으로 제공하는 로그인 URL
IndexController에서userName을model에 저장1 2 3 4 5 6 7 8 9
@GetMapping("/") public String index(Model model) { model.addAttribute("posts", postsService.findAllDesc()); SessionUser user = (SessionUser) httpSession.getAttribute("user"); if (user != null) { model.addAttribute("userName", user.getName()); } return "index"; }
(SessionUser) httpSession.getAttribute("user");: 로그인 성공 시 세션에SessionUser가 들어가기 때문에, 로그인 성공 시 세션에서"user"를 가져올 수 있음
User클래스에@Table(name = "users")어노테이션 추가해야 함- 아니면 아래와 같이 에러남(
user가 reserved라서 테이블 명을 따로 지정해야 함)1
caused by: org.h2.jdbc.jdbcsqlsyntaxerrorexception: syntax error in sql statement "drop table if exists [*]user"; expected "identifier"; sql statement:~
- 아니면 아래와 같이 에러남(
- 로그인 후
update users set role='USER';로 전체 권한 변경 → 로그아웃 후 다시 로그인하면 글쓰기가 정상적으로 작동함 - 처음 로그인했을 때 세션에는 권한이GUEST인 채로 로드되었기 때문에 글쓰면 에러남
어노테이션 기반으로 개선하기
- 지금은 아래와 같은 세션값을 가져오는 부분의 중복이 많음
SessionUser user = (SessionUser) httpSession.getAttribute("user"); config.auth에LoginUserannotation 추가해서 메소드 인자로 세션값을 바로 받을 수 있도록 수정1 2 3 4
@Target(ElementType.PARAMETER) @Retention(RetentionPolicy.RUNTIME) public @interface LoginUser { }
@Target(ElementType.PARAMETER): annotation이 생성될 수 있는 위치 지정@interface: annotation 클래스로 지정
-
config.auth에LoginUserArgumentResolver클래스 생성1 2 3 4 5 6 7 8 9 10 11 12 13 14 15 16 17 18 19
@RequiredArgsConstructor @Component public class LoginUserArgumentResolver implements HandlerMethodArgumentResolver { public final HttpSession httpSession; @Override public boolean supportsParameter(MethodParameter parameter) { boolean isLoginUserAnnotation = parameter.getParameterAnnotation(LoginUser.class) != null; boolean isUserClass = SessionUser.class.equals(parameter.getParameterType()); return isLoginUserAnnotation && isUserClass; } @Override public Object resolveArgument(MethodParameter parameter, ModelAndViewContainer mavContainer, NativeWebRequest webRequest, WebDataBinderFactory binderFactory) throws Exception { return httpSession.getAttribute("user"); } }
supportsParameter():parameter를 지원하는지 판단하기 위한 메소드parameter에@LoginUserannotation이 붙어있고, class Type이SessionUser.class인 경우true반환하도록 오버라이딩
resolveArgument(): 파라미터에 전달할 객체를 생성- 세션에서
"user"에 해당하는 객체를 가져오도록 오버라이딩
- 세션에서
-
config패키지에WebConfig클래스 생성1 2 3 4 5 6 7 8 9 10 11
@RequiredArgsConstructor @Configuration public class WebConfig implements WebMvcConfigurer { private final LoginUserArgumentResolver loginUserArgumentResolver; @Override public void addArgumentResolvers(List<HandlerMethodArgumentResolver> argumentResolvers) { argumentResolvers.add(loginUserArgumentResolver); } }
LoginUserArgumentResolver가 Spring에서 인식될 수 있도록WebMvcConfigurer에 추가함HandlerMethodArgumentResolver는 항상WebMvcConfigurer의addArgumentresolvers()를 통해 추가해야 함
IndexController에서 반복되는 부분을@LoginUser로 대체1 2 3 4 5 6 7 8
@GetMapping("/") public String index(Model model, @LoginUser SessionUser user) { model.addAttribute("posts", postsService.findAllDesc()); if (user != null) { model.addAttribute("userName", user.getName()); } return "index"; }
SessionUser user = (SessionUser) httpSession.getAttribute("user");를 대체함@LoginUser를 사용해서 세션 정보를 가져올 수 있음
세션 저장소로 데이터베이스 사용하기
- 현재는 내장 톰캣의 메모리에 세션 정보가 저장되기 때문에, 앱을 재실행하면 로그인이 풀림
- 즉, 배포할 때마다 톰캣이 재시작됨
- 2대 이상의 서버를 기용하면 톰캣마다 세션 동기화 설정을 해야 함
- 실제 현업에서는 아래와 같은 방법들로 세션 저장소를 운용함
- 톰캣 세션을 사용
- 기본적으로 선택
- WAS에 세션이 저장되기 때문에 2대 이상의 WAS가 구동되는 경우 세션 공유를 위한 추가 설정이 필요
- MySQL과 같은 DB를 세션 저장소로 사용
- 여러 WAS 간의 공용 세션을 사용할 수 있는 편리함
- 로그인 요청마다 DB IO가 발생하기 때문에 성능 이슈 발생 가능
- 로그인 요청이 많이 없는 백오피스, 사내 시스템 등에서 사용
- redis, Memcached와 같은 메모리 DB를 세션 저장소로 사용
- B2C 서비스에서 가장 많이 사용함
- Embedded Redis가 아닌, 외부 메모리 서버가 필요함
- 톰캣 세션을 사용
- 이 예제에서는 DB를 세션 저장소로 사용할 예정
- 설정이 간단, 사용자가 적고 비용 절감을 위함
- 3번은 redis에 별도로 비용을 지불해야 함
build.gradle에implementation 'org.springframework.session:spring-session-jdbc'추가해서 spring-session-jdbc 의존성 추가application.properties에spring.session.store-type=jdbc추가해서 세션 저장소로 jdbc 선택SPRING_SESSION,SPRING_SESSION_ATTRIBUTES테이블이 생성되었지만, 현재는 H2도 spring이 재시작될 때 같이 재시작되기 때문에 이전과 마찬가지로 배포할 때마다 세션이 초기화됨
네이버 로그인
- 네이버 open api에서 앱 등록
- 사용 api : 이름, 이메일, 프로필 사진
- 환경 : pc 웹
- 서비스 URL :
http://localhost:8080 - Callback URL :
http://localhost:8080/login/oauth2/code/naver
-
application-oauth.properties수정1 2 3 4 5 6 7 8 9 10 11 12 13 14 15 16 17 18 19 20
# Naver # registration spring.security.oauth2.client.registration.naver.client-id= // CLIENTID spring.security.oauth2.client.registration.naver.client-secret= // CLIENTSECRET spring.security.oauth2.client.registration.naver.redirect-uri={baseUrl}/{action}/oauth2/code/{registrationId} spring.security.oauth2.client.registration.naver.authorization_grant_type=authorization_code spring.security.oauth2.client.registration.naver.scope=name,email,profile_image # provider spring.security.oauth2.client.provider.naver.authorization_uri=https://nid.naver.com/oauth2.0/authorize spring.security.oauth2.client.provider.naver.token_uri=https://nid.naver.com/oauth2.0/token spring.security.oauth2.client.provider.naver.user-info-uri=https://openapi.naver.com/v1/nid/me spring.security.oauth2.client.provider.naver.user_name_attribute=response # Google spring.security.oauth2.client.registration.google.client-id= // CLIENTID spring.security.oauth2.client.registration.google.client-secret= // CLIENTSECRET spring.security.oauth2.client.registration.google.scope=profile,emailuser_name_attribute=response:네이버에서는user_name의 이름을response로 설정해야 함(회원 조회시 반환되는 json이 아래와 같기 때문)1 2 3 4 5 6 7 8 9
{ "resultcode": "00", "message": "success", "response": { "email": "openapi@naver.com", "nickname": "OpenAPI", ... } }
- Spring Security에서는 하위 필드를 명시할 수 없고, 최상위 필드들만
user_name으로 지정 가능함
- Spring Security에서는 하위 필드를 명시할 수 없고, 최상위 필드들만
스프링 시큐리티 설정 등록
-
dto.OAuthAttributes에 네이버인지 판단하는 코드, 네이버 생성자 추가1 2 3 4 5 6 7 8 9 10 11 12 13 14 15 16 17 18 19 20 21 22 23
... public static OAuthAttributes of(String registrationId, String userNameAttributeName, Map<String, Object> attributes) { if ("naver".equals(registrationId)) { return ofNaver("id", attributes); } return ofGoogle(userNameAttributeName, attributes); } ... private static OAuthAttributes ofNaver(String userNameAttributeName, Map<String, Object> attributes) { Map<String, Object> response = (Map<String, Object>) attributes.get("response"); return OAuthAttributes.builder() .name((String) attributes.get("name")) .email((String) attributes.get("email")) .picture((String) attributes.get("profile_image")) .attributes(attributes) .nameAttributeKey(userNameAttributeName) .build(); } ...
-
index.mustache에 네이버 로그인 버튼 추가1 2 3 4 5 6 7
... {{^userName}} <a href="/oauth2/authorization/google" class="btn btn-success active" role="button">Google Login</a> <a href="/oauth2/authorization/naver" class="btn btn-secondary active" role="button">Naver Login</a> {{/userName}} ...
- 네이버 로그인 URL은
application-oauth.properties에 등록한redirect-uri값에 맞춰 자동으로 등록됨
- 네이버 로그인 URL은
-
한글 깨짐 이슈 해결
- intelliJ 콘솔로
userName출력하면 양효원 제대로 나옴 header.mustache에서<meta>태그 변경해봐도 브라우저에는 ???로 나옴(깨지는 형식이 ???로 일정함)- 템플릿 엔진 문제인것 같아 찾아보니 springboot 2.7에서 mustache에 한글 깨지는 이슈가 있었음
-
application.properties에 아래 설정 추가하니 제대로 나옴1 2
server.servlet.encoding.charset=UTF-8 server.servlet.encoding.force=true
- intelliJ 콘솔로
기존 테스트에 시큐리티 적용하기
- Gradle 메뉴 - Tasks - verification - test 실행해서 전체 테스트 수행
- src와 test는 환경 구성이 별도임
- test에
application.properties가 없을 경우 main의 설정을 가져옴 - 하지만
application-oauth.properties와 같은 다른 설정파일들은 test에 없어도 가져오지 않음
-
test.resource에application.properties생성1 2 3 4 5 6 7 8 9 10 11 12 13
spring.jpa.show_sql=true spring.jpa.properties.hibernate.dialect=org.hibernate.dialect.MySQL57Dialect spring.h2.console.enabled=true spring.session.store-type=jdbc spring.jpa.properties.hibernate.dialect.storage_engine=innodb spring.datasource.hikari.jdbc-url=jdbc:h2:mem://localhost/~/testdb;MODE=MYSQL server.servlet.encoding.charset=UTF-8 server.servlet.encoding.force=true # Test OAuth spring.security.oauth2.client.registration.google.client-id=test spring.security.oauth2.client.registration.google.client-secret=test spring.security.oauth2.client.registration.google.scope=profile,email
CustomOAuth2UserService생성을 위한 소셜 로그인 관련 설정값 추가
build.gradle에testImplementation 'org.springframework.security:spring-security-test'추가- Spring Security에서는 인증되지 않은 사용자의 요청은 이동시키기 때문에,
spring-security-test를 넣고 인증된 사용자를 추가해서 API를 테스트해야 함
- Spring Security에서는 인증되지 않은 사용자의 요청은 이동시키기 때문에,
PostsApiControllerTest의 테스트 메소드에 임의 사용자 인증 추가1 2 3 4 5 6 7 8 9
... @Test @WithMockUser(roles = "USER") public void Create_Posts() throws Exception { ... @Test @WithMockUser(roles = "USER") public void Update_Posts() throws Exception { ...
-
PostsApiControllerTest에 MockMvc 적용1 2 3 4 5 6 7 8 9 10 11 12 13 14 15 16 17 18 19 20 21 22 23 24 25 26 27 28 29 30 31 32 33 34 35 36 37 38 39 40 41 42 43 44 45 46 47 48 49 50 51 52
public class PostsApiControllerTest { ... @Autowired private WebApplicationContext context; private MockMvc mvc; @BeforeEach public void setup() { mvc = MockMvcBuilders .webAppContextSetup(context) .apply(springSecurity()) .build(); } ... @Test @WithMockUser(roles = "USER") public void Create_Posts() throws Exception { ... //when // ResponseEntity<Long> responseEntity = restTemplate.postForEntity(url, requestDto, Long.class); mvc.perform(post(url) .contentType(MediaType.APPLICATION_JSON_UTF8) .content(new ObjectMapper().writeValueAsString(requestDto))) .andExpect(status().isOk()); //then // assertThat(responseEntity.getStatusCode()).isEqualTo(HttpStatus.OK); // assertThat(responseEntity.getBody()).isGreaterThan(0L); ... } @Test @WithMockUser(roles = "USER") public void Update_Posts() throws Exception { ... //when // ResponseEntity<Long> responseEntity = restTemplate.exchange(url, HttpMethod.PUT, requestEntity, Long.class); mvc.perform(put(url) .contentType(MediaType.APPLICATION_JSON_UTF8) .content(new ObjectMapper().writeValueAsString(requestDto))) .andExpect(status().isOk()); //then // assertThat(responseEntity.getStatusCode()).isEqualTo(HttpStatus.OK); // assertThat(responseEntity.getBody()).isGreaterThan(0L); ... } }
mvc.perform(): 생성된 MockMvc를 통해서 API 테스트- body 영역은 문자열로 표현하기 위해
ObjectMapper를 통해 문자열 JSON으로 변환
- body 영역은 문자열로 표현하기 위해
return_hello(),return_helloDto()테스트를 제외한 나머지는 모두 통과함
-
@WebMvcTest는@Controller,@ControllerAdvice를 읽고@Repository,@Service,@Component는 스캔하지 않기 때문에SecurityConfig는 읽고CustomOAuth2UserService는 읽히지 않음-
HelloControllerTest의 스캔 대상에서SecurityConfig를 제외함1 2 3 4 5 6 7 8 9
@ExtendWith(SpringExtension.class) @WebMvcTest(controllers = HelloController.class, excludeFilters = { @ComponentScan.Filter(type = FilterType.ASSIGNABLE_TYPE, classes = SecurityConfig.class) }) public class HelloControllerTest { ...
-
HelloControllerTest에도 위와 마찬가지로@WithMockUser를 사용해 가짜로 인증된 사용자 생성1 2 3 4 5 6 7 8
@Test @WithMockUser(roles = "USER") public void return_hello() throws Exception { ... @Test @WithMockUser(roles = "USER") public void return_helloDto() throws Exception { ...
-
JPA metamodel must not be empty!:@EnableJpaAuditing을 사용하기 위해선 최소 하나의@Entity클래스가 필요한데,@WebMvcTest를 사용하기 때문에 엔티티 클래스가 없기 때문- 현재는
@EnableJpaAuditing이@SpringBootApplication과 같이 있기 때문에@WebMvcTest에서 같이 스캔함 SpringawsApplication에서@EnableJpaAuditing제거config패키지에JpaConfig생성1 2 3 4
@Configuration @EnableJpaAuditing public class JpaConfig { }
- 현재는

Leave a comment