
Express.js + React 강의
- Boiler plate : 자주 쓰이는 코드를 재사용할 수 있도록 미리 만들어놓은 코드
- Node.js를 통해서 javascript를 server side와 같은 browser 이외의 환경에서 사용할 수 있게 됨
- Express.js : Node.js의 framework
index.js: BE 서버의 시작점
MongoDB 연결
- MongoDB 가입 후 cluster 만들어서 DB 생성(cloud 상에 DB 만드는 거임)
- clusters에서 connect → MongoDB User 생성(username, password 기억해야 함)
- connection method : connect your application
connection string only(
mongodb+srv://~) 복사해놓음 - Mongoose 패키지 설치(Mongoose를 통해 앱과 MongoDB를 연결할 수 있음)
mongoose.connect('mongodb+srv://~', {useNewUrlParser: true, useUnifiedTopology: true, useCreateIndex: true, useFindAndModify: false})안에 위의mongodb+srv~넣으면 됨(’’으로 감싸줘야 함) async 실행임
Module, Package, Framework, Library 차이 Module : 함수 등을 불러올 수 있는 파일,
import로 불러올 수 있음 Package : 여러 모듈의 묶음,npm으로 설치하고 사용함 Framework : 하나의 프로그램을 구동할 수 있도록 패키지를 모아놓은 것(Spring, …)
- 정해진 폴더 트리가 존재함
Library : 공통으로 사용되는 특정 기능을 모듈화한 것, 패키지와 모듈의 묶음(react, …)
MongoDB Model & Schema
1
2
3
4
5
6
7
8
9
10
11
12
13
14
15
16
17
18
19
20
21
22
23
24
25
26
27
28
29
30
31
32
33
34
35
36
const mongoose = require("mongoose");

const userSchema = mongoose.Schema({
  name: {
    type: String,
    maxlength: 50,
  },
  email: {
    type: String,
    trim: true,
    unique: 1,
  },
  password: {
    type: String,
    minlength: 5,
  },
  lastname: {
    type: String,
    maxlength: 50,
  },
  role: {
    type: Number,
    default: 0,
  },
  image: String,
  token: {
    type: String,
  },
  tokenExp: {
    type: Number,
  },
});

const User = mongoose.model("User", userSchema);

module.exports = { User };
- Schema는 db에 들어가는 데이터에 대한 정보(type, maxlen 등)을 지정해줌
- role : admin/user
- token : 로그인 유효성 검사
- schema를 model로 감싸줌
- 보통
models폴더 안에 schema 작성함
Body-parser & PostMan & 회원 가입 기능
- Body-parser를 통해 client에서 보내는 데이터를 받을 수 있음
- Postman을 client 대신 사용 가능함
1
2
3
4
5
6
7
8
9
10
11
12
13
14
15
16
17
const express = require("express");
const app = express();
const bodyParser = require("body-parser");
const { User } = require("./modules/User");

//url, json 형태의 데이터를 파싱하도록 설정
app.use(bodyParser.urlencoded({ extended: true }));
app.use(bodyParser.json());

app.get("/", (req, res) => res.send("Hello World"));
app.post("/register", (req, res) => {
  const user = new User(req.body);
  user.save((err, userInfo) => {
    if (err) return res.json({ success: false, err });
    return res.status(200).json({ success: true });
  });
});
req는 이미 body parser로 파싱된 데이터- client에서 보내려면
localhost:5000/register으로 post 보내면 됨
Nodemon 설치
- 원래는 코드 수정하면 서버 재시작해야 하지만, nodemon을 사용하면 서버가 켜져있어도 자동으로 바꿔줌
- 설치할 때
--save-dev옵션 붙여서 development mode로 설치하는게 좋음 - nodemon으로 시작하려면
package.json안에 script 만들어줘야 함”backend”: “nodemon index.js”
보안 정보 관리
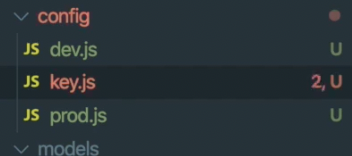
- mongoDB 연결하는 부분에 id, pw가 노출될 수 있음
config/dev.js에서 설정 가능함
1
2
3
4
5
6
7
8
9
10
11
12
13
14
15
16
17
18
19
20
21
//dev.js
module.exports={
	mongoURI: 'mongodb+srv~'
}

//prod.js
module.exports={
	mongoURI: process.env.MONGO_URI // heroku
}

//key.js
if(process.env.NODE_ENV=='production'){
	module.exports=require('./prod');
} else {
	module.exports=require('./dev');
}

//index.js
const config=require('./config/key');
...
mongoose.connect(config.mongoURI, ...);
- deploy할 때 heroku를 사용하면 위와같이 할 필요가 없음
- local 환경에서
dev.js에서 가져오게 만들 때 위와 같이 사용함 - github에 푸시할 때
dev.js는 올라가지 않아야 하지 때문에.gitignore에 추가해줘야 함
React
- Real DOM은 하나의 attribute만 바뀌어도 다 update해야 하지만, Virtual DOM은 그 하나만 바꿀 수 있음
- snapshot을 찍어두고 바뀐 부분만 Real DOM에서 바꿔줌
npm vs npx
- npm(node package manager) : 모듈 다운로드, 프로젝트 빌드, 실행
-g옵션을 주지 않으면 local(node_modules)에 다운받음
- 원래는 create-react-app을 사용할 때
npm install -g create-react-app으로 다운받았지만, 지금은npx를 사용해서 node repository에 있는 create-react-app을 사용할 수 있음- 저장공간 낭비하지 않음 모듈의 최신 버전을 불러와 실행만 시킨 후에 다시 삭제함
- 항상 최신 버전을 사용할 수 있음
- create-react-app 자체도 간단한 SPA를 만들어주는 하나의 패키지라 볼 수 있음
create-react-app
- 전에는 babel, webpack 등을 다 설정해야 했지만, 지금은 create-react-app으로 한 번에 설정 가능
- babel : 최신 JS method들을 ES6 JS 문법으로 변환시켜줌
- webpack : 최근의 웹페이지들은 모듈을 많이 사용하는데, 이 모듈들을 합해서 간단하게 만들어주는 moudle bundler
- webpack은
src폴더만 관리하기 때문에, 이미지도src에 넣어서 webpack으로 묶이도록 만드는게 좋음
- webpack은
- 먼저 root directory에
server,client로 나누는게 좋음 client폴더 안에서npx create-react-app .로 react 설치
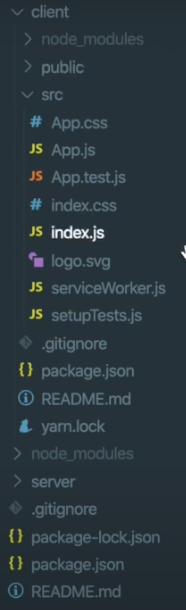
client내부가 create-react-app을 했을 때 생기는 기본 구조index.js의ReactDOM.render(<App />, document.getElementById('root'));에서 페이지를 렌더링해줌 App component를index.html안의 id가root인 div element로 렌더링함
CRA 수정(+redux)
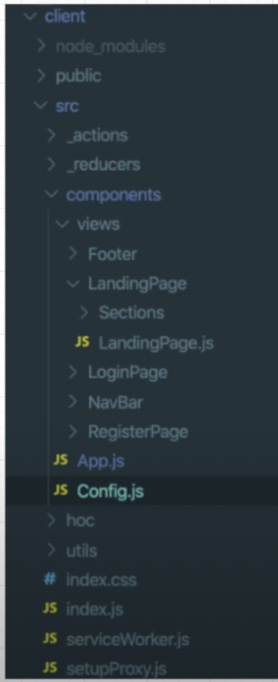
_actions,_reducer: redux에서 사용components/views: 페이지들을 넣음components/views/Sections: 페이지에 관련된 css, component들을 넣음App.js: Routing 관련Config.js: 환경 변수 등 설정hoc: Higher Order Component- hoc는
higherOrderComponent라는 함수임 - 로그인 한 사람만 들어갈 수 있는 component가 있다하면, auth를 통해 로그인 했는지 확인함 → auth가 hoc가 적용된 component이고, 그 안에 loggedin component들을 넣어줌 auth 말고 다른 기능들을 hoc로 사용할 수도 있음
- hoc는
utils: 여러 페이지들에서 쓰일 수 있는 component들을 모아놓음
React Router Dom
- nav bar 부분을 component에 대한 링크로 만들고 연결시켜줌
<Route>component 사용
Axios
- ajax와 비슷하게 네트워크 요청을 담당하는 패키지임
- client에서 axios를 이용해서 server로 요청 보낼 수 있음
1
2
3
4
5
6
7
8
9
10
11
12
// LandingPage.js의 component 안에서
useEffect(() => {
  axios
    .get("http://localhost:5000/api/hello")
    .then((response) => console.log(response.data));
}, []);

// 서버의 index.js에서
app.get("/api/hello", (req, res) => {
  // 받은 데이터로 명령 수행
  res.send("hello");
});
useEffect는 페이지 들어오자마자 실행되는 함수임- 근데 이렇게하면 CORS 에러남
CORS
- 서버는
localhost:5000, 클라이언트는localhost:3000이때 client→server로 데이터 보내면 CORS때문에 오류남 - CORS(Cross-Origin Resource Sharing) : 서로 다른 origin에서 리소스 공유할 때 따르는 정책
domain-a.com끼리 주고받을 때는 항상 request가 허용됨domain-a.com,domain-b.com이 request할 때는 CORS에 의해 제어됨
- 개발자 도구를 사용하거나 jsonp, proxy 등으로 해결 가능
http-proxy-middlewarepackage를 사용함client/src/setupProxy.js를 만들고 코드를 넣어야 함 이때는 landing page의axios.get에서localhost:5000/까지는 지워줘야 함
Proxy Server
- server, client 사이에 proxy server가 들어갈 수 있음
- proxy 서버의 역할
- IP, 데이터 변환
- 캐시, 공유 데이터 제공
- 사용 이유
- 인터넷 사용 제어
- 캐시를 통해 인터넷 속도 향상
- 보안
- 이용 제한된 사이트 접근
Concurrently
- FE, BE 서버를 한 번에 제어 가능한 패키지
package.json에"start": "concurrently \"command1 arg\" \"command2 arg\""와 같이 커맨드 등록하면 편함- 원래는 client, server 각각의 디렉토리에서
npm start해줘야 함1
"dev": "concurrently \"npm run backend\" \"npm run start --prefix client\""
- 서버쪽
package.json에 등록한 내용
- 원래는 client, server 각각의 디렉토리에서
Ant Design CSS Framework
- client에서
npm install antd하고index.js에서import 'antd/dist/antd.css';로 불러와야 함
Redux
- state를 관리해주는 container임
- react에서는 props, state가 존재함
- props
1
<ChatMessages messages={messages} currentMember={member} />
ChatMessages라는 자식 component에 props를 내려주는 상황- component 간에 props(attribute)를 주고받을 때 부모 → 자식으로만 보낼 수 있음
- props는 immutable하기 때문에 부모 → 자식으로 내려받은 props가 변경되려면 부모에서 다시 받아야 함
- state
1
2
3
4
5
state = {
  message: "",
  attachFile: undefined,
  openMenu: false,
};
- 한 component 안에서 데이터를 교환하고 싶을 때 state에 담아야 함
- component 안에서는 state를 변하게 할 수 있음(state가 변하면 component가 rerendering됨)

- state를 상위 component에 두지 않고 store를 이용해 관리할 경우 가져오는 단계를 줄일 수 있음
Redux data flow
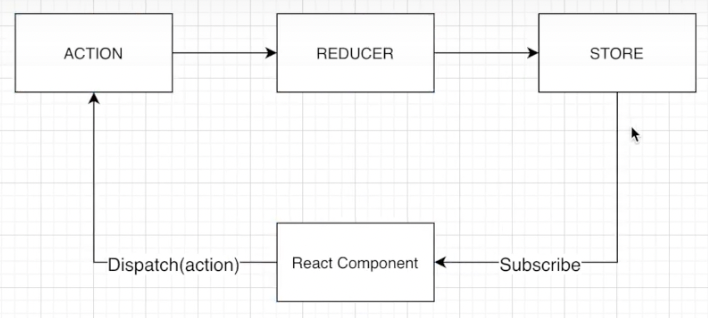
- strict unidirectional(철저한 단방향임)
Action
- 무엇이 일어났는지 설명하는 객체
1
2
3
{type: 'LIKE_ARTICLE', articleId: 42}
{type: 'FETCH_USER_SUCCESS', response: {id: 3, name: 'Mary'}}
{type: 'ADD_TODO', text: 'Read the Redux docs.'}
- 42번 글의 좋아요 눌러짐 Mary의 정보를 불러오는데 성공함 text를 todo에 넣음
Reducer
1
(previousState, action) => nextState;
- prevState와 action 객체를 받아서 next state를 반환하는 함수
- reducer는 pure function임
- argument 수정하면 안됨
- api 호출, routing 변경 등의 side effect가 있는 명령 수행하면 안됨
- non-pure function(
Date.now(),Math.random(), …)을 호출하면 안됨
Store
- app의 state을 저장하는 객체
- 내부의 method를 이용해 state를 관리할 수 있음
Redux 활용
npm install redux react-redux redux-promise redux-thunk로 설치- store에서 dispatch(action) 객체를 받을 때도 있지만, function이나 promise 타입으로 올 때도 있음 middleware를 통해 function, promise 받을 수 있음: - redux-thunk : dispatch에 function을 받는 방법을 추가함 - redux-promise : dispatch에 promise를 받는 방법을 추가함
Redux 연결
1
2
3
4
5
6
7
8
9
10
11
12
13
14
15
16
17
18
19
20
// client/src/index.js
import {Provider} from 'react-redux';
import {applyMiddleware, createStore} from 'redux';
import promiseMiddleware from 'redux-promise';
import ReduxThunk from 'redux-thunk';
import Reducer from './_reducers';

const createStoreWithMiddleware=applyMiddleware(promiseMiddleware, ReduxThunk)(createStore);
...
ReactDOM.render(
	<Provider
		store={createStoreWithMiddleware(Reducer,
			window.__REDUX_DEVTOOLS_EXTENSION__ &&
			window.__REDUX_DEVTOOLS_EXTENSION__()
		)}
	>
		<App />
	</Provider>

	, document.getElementById('root'));
- chrome 확장 프로그램 중에 redux dev tools 받아야 함
1
2
3
4
5
6
7
8
9
10
11
// client/src/_reducers/index.js
import { combineReducers } from "redux";
import user from "./user_reducer";
// import comment from './comment_reducer'; // 다른 reducer 예시

const rootReducer = combineReducers({
  user,
  //	comment,
});

export default rootReducer;
- store에 여러 가지 reducer가 존재할 수 있음
- reducer는 state의 새로운 값을 리턴해줌
- user, subscribe 등 여러 기능에 대한 state가 있을 수 있고, 따라서 여러 reducer가 존재 가능
- 이런 reducer들을 combineReducers를 통해 rootReducer이라는 하나의 reducer로 합침
React Hooks
Functional component
- functional component는 class component보다 제공하는 기능이 적었음
- component를 생성할 때 제어가 힘듦
- react 16.8부터 hook을 통해 사용 가능
1
2
3
4
5
6
7
8
9
10
11
12
13
14
15
16
17
18
19
20
21
22
23
24
25
26
27
28
29
30
31
32
33
34
35
36
37
38
39
40
41
42
43
44
45
46
// class component
import React, {Component} from 'react';
import Axios from 'axios';

export default class Hello extends Component {
	constructor(props){
		super(props);
		this.state={name: ""};
	}

	componentDidMount(){
		Axios.get('/api/user/name')
		.then(response => {
			this.setState({name: response.data.name});
		});
	}

	render(){
		return {
			<div>
				My name is {this.state.name}
			</div>
		}
	}
}

// functional component
import React, {useEffect, useState} from 'react';
import Axios from 'axios';

export default function Hello() {
	const [Name, setName]=useState("");

	useEffect(() => {
		Axios.get('/api/user/name')
		.then(response => {
			setName(response.data.name);
		})
	}, []);

	return (
		<div>
			Mu name is {Name}
		</div>
	)
}
useEffect훅은componentDidMount()와 같은 기능임- react lifecycle 알아놓는게 좋음

Leave a comment