
JSnote9: Classes
Classes
Class basic syntax
new와 constructor function을 이용해서 비슷한 종류의 객체를 여러 개 만들 수 있지만, class를 이용하면 OOP와 관련된 다양한 기능을 사용할 수 있음
The “class” syntax
1
2
3
4
5
6
7
8
9
10
11
12
13
14
15
16
17
18
19
20
21
class MyClass {
  constructor() { ... }
  method1() { ... }
  method2() { ... }
  ...
}

/*-------------example--------------*/

class User {
  constructor(name) {
    this.name = name;
  }

  sayHi() {
    alert(this.name);
  }
}

let user = new User("John");
user.sayHi();
constructor()method는new에 의해 자동으로 호출됨
new User("John")이 호출되었을 때- 새로운 객체가 생성됨
constructor가 실행됨
class는 method 사이에
,가 없음
What is a class?
JS에서 class는 Function으로 취급됨:
1
2
3
4
5
6
7
8
9
10
11
12
class User {
  constructor(name) { this.name = name; }
  sayHi() { alert(this.name); }
}

alert(typeof User); // function

alert(User === User.prototype.constructor); // true

alert(User.prototype.sayHi); // the code of the sayHi method

alert(Object.getOwnPropertyNames(User.prototype)); // constructor, sayHi
class User {...}이 실행하는 것:User라는 함수를 만듦.
함수 코드는contructor메소드에서 가져옴!- 클래스 메소드를
User.prototype에 저장함
new User객체가 생성된 뒤, 메소드를 호출하면 메소드는 prototype에서부터 가져옴
Not just a syntactic sugar
사실 class는 class라는 기능을 사용하지 않고 함수와 F.prototype으로만 구현할 수 있기 때문에 syntactic sugar라고도 불리기도 함:
1
2
3
4
5
6
7
8
9
10
function User(name) {
  this.name = name;
}

User.prototype.sayHi = function() {
  alert(this.name);
};

let user = new User("John");
user.sayHi();
- 위의
class를 사용한 코드와 거의 같음 - function prototype은 기본으로 constructor가 있기 때문에 다시 생성할 필요가 없음
하지만, 몇 가지 차이점이 있음:
class로 생성된 함수는 내부 property[[IsClassConstructor]]: true를 가짐
다양한 곳에서 이 property를 확인함
e.g. 보통 함수와는 다르게, 무조건new와 함께 호출되어야 함
또한, class constructor를 출력하면 “class로 시작함”:1 2 3 4 5
class User { constructor() {} } alert(User); // class User { ... }
- class method들은 non-enumerable함
클래스 정의는"prototype"안의 method들의enumerableflag를false로 설정함
객체에 대해서for...in를 실행할 때 보통 class method까지 필요없기 때문 - class는 항상
use strict가 적용됨
즉, class construct 안의 코드들은 자동으로 strict mode임
Class Expression
function expression과 같이, 클래스도 expression으로 정의할 수 있음:
1
2
3
4
5
let User = class {
  sayHi() {
    alert("Hello");
  }
};
NFE와 같이, 이름을 지정할 수도 있음:
1
2
3
4
5
6
7
8
9
let User = class MyClass {
  sayHi() {
    alert(MyClass); // MyClass name is visible only inside the class
  }
};

new User().sayHi(); // works, shows MyClass definition

alert(MyClass); // error
- “Named Class Expression”이라 생각하면 됨
MyClass는 class expression 안에서만 사용한 이름이기 때문에alert(MyClass)와 같이 밖에서는 사용할 수 없음!
아래와 같이 class의 generator를 만들 수도 있음:
1
2
3
4
5
6
7
8
9
10
11
function makeClass(phrase) {
  return class {
    sayHi() {
      alert(phrase);
    }
  };
}

let User = makeClass("Hello");

new User().sayHi(); // Hello
makeClass("Hello")의 lexical environment에 저장된phrase를User에서 이용함
Getters/setters
getter, setter도 literal object와 비슷하게 사용할 수 있음:
1
2
3
4
5
6
7
8
9
10
11
12
13
14
15
16
17
18
19
20
21
22
23
24
class User {

  constructor(name) {
    this.name = name;
  }

  get name() {
    return this._name;
  }

  set name(value) {
    if (value.length < 4) {
      alert("Name is too short.");
      return;
    }
    this._name = value;
  }

}

let user = new User("John");
alert(user.name); // John

user = new User(""); // Name is too short.
- getter, setter가
User.prototype에 저장됨
Computed names […]
1
2
3
4
5
6
7
class User {
  ['say' + 'Hi']() {
    alert("Hello");
  }
}

new User().sayHi();
Class fields
class field가 property 역할을 함:
1
2
3
4
5
6
7
8
9
class User {
  name = "John";

  sayHi() {
    alert(`Hello, ${this.name}!`);
  }
}

new User().sayHi(); // Hello, John!
- property와는 다르게
=을 사용함 - field는
User.prototype에 저장되지 않고 각각의 object에 저장됨!
Making bound methods with class fields
class에서도 “losing this” 문제가 발생함:
1
2
3
4
5
6
7
8
9
10
11
12
13
class Button {
  constructor(value) {
    this.value = value;
  }

  click() {
    alert(this.value);
  }
}

let button = new Button("hello");

setTimeout(button.click, 1000); // undefined
- wrapper function을 인자로 전달하거나 context를 bind해서 해결할 수 있었음
- class field는 대입 연산자를 사용하기 때문에 더 간단하게 해결 가능:
1
2
3
4
5
6
7
8
9
10
11
12
  class Button {
    constructor(value) {
      this.value = value;
    }
    click = () => {
      alert(this.value);
    }
  }

  let button = new Button("hello");

  setTimeout(button.click, 1000); // hello
-
click은 class field이기 때문에 object마다 생성됨
=> 안의this는 객체에 bind됨, 아무 곳에나button.click을 전달해도 context가 올바로 들어감browser 환경에서 event linstner을 구현할 때 유용함
-
Summary
class는 기술적으로는 함수에 속함- 클래스의 이름이 constructor처럼 사용되고, 안에 선언된 실제 constructor의 코드를 가져옴
- method, getter, setter들은 prototype에 저장되고, class field는 각각의 object에 저장됨
Tasks
아래의 Clock을 class로 바꾸기
1
2
3
4
5
6
7
8
9
10
11
12
13
14
15
16
17
18
19
20
21
22
23
24
25
26
27
28
29
30
31
32
33
34
35
function Clock({ template }) {
  let timer;

  function render() {
    let date = new Date();

    let hours = date.getHours();
    if (hours < 10) hours = '0' + hours;

    let mins = date.getMinutes();
    if (mins < 10) mins = '0' + mins;

    let secs = date.getSeconds();
    if (secs < 10) secs = '0' + secs;

    let output = template
	  .replace('h', hours)
	  .replace('m', mins)
	  .replace('s', secs);

    console.log(output);
  }

  this.stop = function() {
    clearInterval(timer);
  };

  this.start = function() {
    render();
    timer = setInterval(render, 1000);
  };
}

let clock = new Clock({template: 'h:m:s'});
clock.start();
바꾼 코드:
1
2
3
4
5
6
7
8
9
10
11
12
13
14
15
16
17
18
19
20
21
22
23
24
25
26
27
28
29
30
31
32
33
34
35
36
37
class Clock{
  constructor(template) {
    this.template=template;
  }

  render() {
    let date = new Date();

    let hours = date.getHours();
    if (hours < 10) hours = '0' + hours;

    let mins = date.getMinutes();
    if (mins < 10) mins = '0' + mins;

    let secs = date.getSeconds();
    if (secs < 10) secs = '0' + secs;

    let output = this.template
    .replace('h', hours)
    .replace('m', mins)
    .replace('s', secs);

    console.log(output);
  }

  stop() {
  	clearInterval(this.timer);
  }

  start() {
    this.render();
    this.timer = setInterval(() => this.render(), 1000); // (*)
  }
}

let clock = new Clock('h:m:s');
clock.start();
- 객체
{template: 'h:m:s'}를 인자로 받는 것은 그냥 string을 받는 것으로 바꿔도 정상적으로 작동함 (*)의 함수를setInterval(this.render, 1000);으로 바꾸면render의 reference를 argument로 넘기는데this를 지정해주지 않았기 때문에this는 window scope(globalThis)를 가리키게 됨
cf. arrow function으로 넘기면 아예 저 method를 실행하는 wrapper를 넘기는 것이기 때문에 자동으로 context까지 지정됨
this와 lexical environment는 서로 다른 개념임!
lexical environment는 JS engine 내부에서 쓰이는 객체고,this는 우리가 직접 사용하는 context를 나타냄
lexical environment는 코드에서 변수를 찾아주는 역할을 함(변수의 영역 같은 개념)
this는 method나 property를 가져올 객체를 지정
arrow function에서this는 outer normal function에서 가져온다고 써져있는게 outer normal function의 lexical environment를 가리키는게 아니라, outer normal function의this를 가져오는 것임!!!nested function expresson에서
this를 마음대로 쓰면 안되는 이유도 그 함수 코드 안에서this를 명시해주지 않았기 때문이지, outer function의 lexical environment가 nested function의this로 지정되었기 때문이 아님!!!
Class inheritance
클래스 상속을 이용해서 클래스를 확장할 수 있음
=> 새 기능을 얹을 수 있음
The “extends” keyword
Animal class에 관한 코드:
1
2
3
4
5
6
7
8
9
10
11
12
13
14
15
16
class Animal {
  constructor(name) {
    this.speed = 0;
    this.name = name;
  }
  run(speed) {
    this.speed = speed;
    alert(`${this.name} runs with speed ${this.speed}.`);
  }
  stop() {
    this.speed = 0;
    alert(`${this.name} stands still.`);
  }
}

let animal = new Animal("My animal");
Rabbit 클래스를 아래와 같이 추가함:
1
2
3
4
5
6
7
8
9
10
class Rabbit extends Animal {
  hide() {
    alert(`${this.name} hides!`);
  }
}

let rabbit = new Rabbit("White Rabbit");

rabbit.run(5); // White Rabbit runs with speed 5.
rabbit.hide(); // White Rabbit hides!
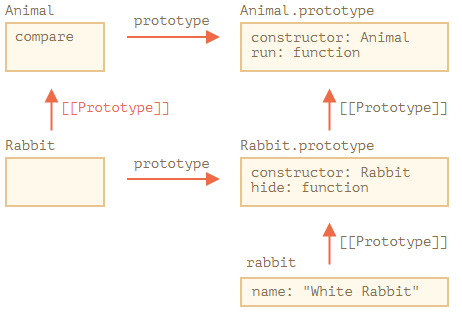
rabbit은Rabbit의 method,Animal의 method 모두에 접근할 수 있음- 위 코드에서
extends키워드는Rabbit.prototype.[[Prototype]]을Animal.prototype으로 설정함
 |
|---|
| javascript.info 참고 |
1
=> `rabbit`, `Rabbit.prototype`, `Animal.prototype` 순으로 메소드를 찾음
extends뒤에는 모든 expression이 허용됨
예를 들어, 클래스를 생성하는 함수를extends뒤에 호출해도 됨:
User클래스는f("Hello")가 반환한 클래스를 상속받음
Overriding a method
Rabbit 클래스에 명시되어있지 않은 method들은 Animal 클래스로부터 그대로 가져옴
하지만 Rabbit에 method를 명시하면 Animal에도 같은 이름의 method가 있어도 Rabbit에 있는 것을 사용함
보통 parent method를 완전히 바꾸지 않고 확장하기 때문에 super를 이용해서 parent method의 호출을 지원함
super.method(...): parent method 호출super(...): parent constructor 호출(현재 constructor 안에서만 적용됨)
Example
1
2
3
4
5
6
7
8
9
10
11
12
13
14
15
16
17
18
19
20
21
22
23
24
25
26
27
28
29
30
31
32
class Animal {
  constructor(name) {
    this.speed = 0;
    this.name = name;
  }

  run(speed) {
    this.speed = speed;
    alert(`${this.name} runs with speed ${this.speed}.`);
  }

  stop() {
    this.speed = 0;
    alert(`${this.name} stands still.`);
  }
}

class Rabbit extends Animal {
  hide() {
    alert(`${this.name} hides!`);
  }

  stop() {
    super.stop(); // call parent stop
    this.hide(); // and then hide
  }
}

let rabbit = new Rabbit("White Rabbit");

rabbit.run(5); // White Rabbit runs with speed 5.
rabbit.stop(); // White Rabbit stands still. White Rabbit hides!
arrow function은
super가 없음
super도 outer function에서부터 가져옴:
setTimeout(function() { super.stop() }, 1000);으로 바꾸면 에러남
function()안에서super가 명시되지 않았기 때문
Overriding constructor
specification에 따르면, 다른 클래스를 확장하는 클래스가 constructor를 가지지 않으면, 아래와 같은 empty constructor가 생성됨:
1
2
3
4
5
class Rabbit extends Animal {
  constructor(...args) {
    super(...args);
  }
}
아래의 코드에서는 Rabbit에 직접 constructor를 추가함:
1
2
3
4
5
6
7
8
9
10
11
12
13
14
15
16
17
18
19
class Animal {
  constructor(name) {
    this.speed = 0;
    this.name = name;
  }
  // ...
}

class Rabbit extends Animal {

  constructor(name, earLength) {
    this.speed = 0;
    this.name = name;
    this.earLength = earLength;
  }
  // ...
}

let rabbit = new Rabbit("White Rabbit", 10); // Error: this is not defined.
Rabbit에 직접 추가한constructor는 에러남
상속받는 클래스의 생성자는 무조건super(...)를this를 쓰기 이전에 호출해야 함!!
상속받는 클래스의 생성자가 위와 같은 조건이 있는 이유
JS에서 상속받는 클래스의 constructor function(= “derived constructor”)은 내부 property[[ConstructorKind]]:"derived"를 가짐
이 property로 인해new와 함께 쓰일 때 아래와 같은 제한 사항이 생김:
보통의 함수가new와 함께 실행될 때 empty object를 생성하고 그것을this에 넣지만, derived constructor은 parent constructor가 이 작업을 해줄 것이라 가정함
따라서 derived constructor는super()로 empty object를 생성하지 않으면 에러가 남
위의 derived constructor는 아래와 같이 구현해야 함:
1
2
3
4
constructor(name, earLength) {
  super(name);
  this.earLength = earLength;
}
Overriding class fields: a tricky note
method뿐만 아니라 field도 override 할 수 있음:
1
2
3
4
5
6
7
8
9
10
11
12
13
14
class Animal {
  name = 'animal';

  constructor() {
    alert(this.name);
  }
}

class Rabbit extends Animal {
  name = 'rabbit';
}

new Animal(); // animal
new Rabbit(); // animal
Rabbit은Animal을 extend하고name을 override함Rabbit은 생성자가 없기 때문에 parent constructor가 자동으로 호출되는데, 이 때 parent constructor는 derived class에서 사용되어도 항상 parent field를 사용함!
cf. method를 override할 경우:
1
2
3
4
5
6
7
8
9
10
11
12
13
14
15
16
17
18
class Animal {
  showName() {  // instead of this.name = 'animal'
    alert('animal');
  }

  constructor() {
    this.showName(); // instead of alert(this.name);
  }
}

class Rabbit extends Animal {
  showName() {
    alert('rabbit');
  }
}

new Animal(); // animal
new Rabbit(); // rabbit
Rabbit에서 parent constructor가 호출되어도this.showName()가Rabbit.showName()을 호출해서rabbit이 출력됨- derived class에서 호출되면 derived class의 method를 쓰기 때문에 field를 override 할 때보다 자연스러운 결과가 나옴
field와 method를 사용할 때 다르게 처리되는 이유:
field의 초기화 순서 때문임
- 아무것도 상속받지 않은 base class에서는 생성자 이전에 초기화됨
- derived class의 경우
super()뒤에 초기화됨
따라서 위 예시의 경우 method는 이미 초기화된 상태지만, parent constructor가 호출되는 시점에서 Rabbit의 field는 초기화되지 않았기 때문에 Animal의 field를 사용할 수 밖에 없음
field와 method의 초기화 순서 차이는 JS에서만 다름
그리고 overriden field가 parent constructor에서 사용되는 특정한 상황에서만 이 차이점이 영향을 미침
문제가 될 경우 field 대신 method나 getter/setter를 사용해서 해결할 수도 있음
Super: internals, [[HomeObject]]
super.method()는 this.__proto__.method()로 호출할 수 있을 것 같지만, 아래 예제에서 볼 수 있듯이, 상속이 여러 번 일어나는 구조에서는 제대로 작동하지 않음
편의를 위해 아래 예제는 class가 아닌 plain object를 사용함:
1
2
3
4
5
6
7
8
9
10
11
12
13
14
15
16
17
18
19
20
21
22
23
24
25
let animal = {
  name: "Animal",
  eat() {
    alert(`${this.name} eats.`);
  }
};

let rabbit = {
  __proto__: animal,
  name: "Rabbit",
  eat() {
    this.__proto__.eat.call(this); // (*)
  }
};

let longEar = {
  __proto__: rabbit,
  name: "Long ear",
  eat() {
    this.__proto__.eat.call(this); // (**)
  }
};

rabbit.eat(); // Rabbit eats.
longEar.eat(); // Error: Maximum call stack size exceeded
- class에서는
new Rabbit이Rabbit.prototype을 상속받고,Rabbit.prototype이Animal.prototype을 extend하지만, 이 예제는 plain object이기 때문에longEar->rabbit->animal으로 chain이 형성됨 rabbit.eat()의 실행 과정:
this.__proto__을 이용해서animal에 접근할 수 있지만,animal.eat()가 실행될 때 context가this.__proto__인animal이 되기 때문에call(this)를 사용해서animal.eat()을 실행할 때 context를rabbit으로 설정함 => 의도한 대로 실행됨longEar.eat()의 실행 과정:
this.__proto__를 이용해서rabbit에 접근하지만, 위와 마찬가지의 이유로call(this)로 context를 바꾼 상태임rabbit.eat()에서도this.__proto__.eat.call(this)를 호출하는데, 이 때this가longEar이므로longEar.__proto__.eat.call(longEar)를 호출하는 것과 마찬가지임
따라서rabbit.eat()에서 계속 재귀호출이 일어나게 됨!
[[HomeObject]]
이런 문제를 해결하기 위해 [[HomeObject]]가 존재함
class나 object의 method는 자신이 명시된 객체를 저장하는 [[HomeObject]] property를 가짐
super는 [[HomeObject]]를 사용해서 parent prototype과 method를 찾음
Example
1
2
3
4
5
6
7
8
9
10
11
12
13
14
15
16
17
18
19
20
21
22
23
24
let animal = {
  name: "Animal",
  eat() {         // animal.eat.[[HomeObject]] == animal
    alert(`${this.name} eats.`);
  }
};

let rabbit = {
  __proto__: animal,
  name: "Rabbit",
  eat() {         // rabbit.eat.[[HomeObject]] == rabbit
    super.eat();
  }
};

let longEar = {
  __proto__: rabbit,
  name: "Long Ear",
  eat() {         // longEar.eat.[[HomeObject]] == longEar
    super.eat();
  }
};

longEar.eat();  // Long Ear eats.
this를 사용하지 않고 prototype으로부터 parent method를 가져올 수 있음
Methods are not “free”
JS에서 function은 객체에 bind 되지 않기 때문에 객체 간에 method를 복사하고 다른 this로 함수를 호출할 수 있음
[[HomeObject]]는 이러한 특성을 위반함
∵ method가 자신이 선언된 객체를 기억하고, [[HomeObject]]는 바뀌지 않고 계속 지속되기 때문
하지만 [[HomeObject]]가 사용되는 곳은 오직 super 뿐임
=> super를 사용하지 않으면 method의 자유도가 보장됨
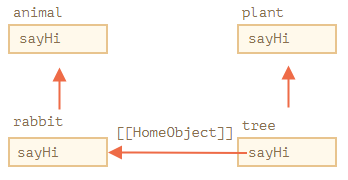
즉, super를 사용하는 method는 복사할 때 주의해야 함:
1
2
3
4
5
6
7
8
9
10
11
12
13
14
15
16
17
18
19
20
21
22
23
24
25
let animal = {
  sayHi() {
    alert(`I'm an animal`);
  }
};

let rabbit = {
  __proto__: animal,
  sayHi() {
    super.sayHi();
  }
};

let plant = {
  sayHi() {
    alert("I'm a plant");
  }
};

let tree = {
  __proto__: plant,
  sayHi: rabbit.sayHi // (*)
};

tree.sayHi();  // I'm an animal (?!?)
rabbit->animal,tree->plant(*)에서tree.sayHi는rabbit.sayHi를 복사함
rabbit.sayHi의[[HomeObject]]는rabbit이므로tree.sayHi()를 호출해도super.sayHi()가animal.sayHi()를 호출함
 |
|---|
| javascript.info 참고 |
Methods, not function properties
[[HomeObject]]는 class method와 object method에서 정의될 수 있지만, object method에서 제대로 작동하게 하려면 반드시 method syntax(method(){...})의 형태로 정의해야 함
non-method syntax(method: function(){...})로 정의하면 안됨!
∵ [[HomeObject]] property가 설정되지 않음!!
Summary
extends를 사용해서 클래스를 상속할 수 있음derived.prototype.[[Prototype]]을parent.prototype으로 설정함
- constructor를 overriding 할 때,
super()가this를 사용하기 전에 호출되어야 함!- parent의 constructor에서 empty object를 만들어줘야 하기 때문
- method를 overriding할 때,
super.method()로 parent의 method를 호출할 수 있음- method들은
[[HomeObject]]로 자신이 선언된 객체를 기억함
=>this.__proto__대신super를 사용해서 inheritance chain을 거슬러 올라갈 수 있음 super가 사용되는 method를 복사할 때 주의해야 함!
- method들은
- arrow function은
this,arguments,super가 없기 때문에 outer context의 그것을 사용함
Tasks
Extended clock
1
2
3
4
5
6
7
8
9
10
11
12
13
14
15
16
17
18
19
20
21
22
23
24
25
26
27
28
29
30
31
32
33
34
35
36
37
38
39
40
41
42
43
44
45
46
47
48
49
50
51
52
53
class Clock {
  constructor({ template }) {
    this.template = template;
  }

  render() {
    let date = new Date();

    let hours = date.getHours();
    if (hours < 10) hours = '0' + hours;

    let mins = date.getMinutes();
    if (mins < 10) mins = '0' + mins;

    let secs = date.getSeconds();
    if (secs < 10) secs = '0' + secs;

    let output = this.template
      .replace('h', hours)
      .replace('m', mins)
      .replace('s', secs);

    console.log(output);
  }

  stop() {
    clearInterval(this.timer);
  }

  start() {
    this.render();
    this.timer = setInterval(() => this.render(), 1000);
  }
}

class ExtendedClock extends Clock {
  constructor({template, precision=1000}) {
    super({template});
    this.precision = precision;
  }

  start() {
    this.render();
    this.timer=setInterval(() => this.render, this.precision); // (*)
  }
}

let lowResolutionClock = new ExtendedClock({
  template: 'h:m:s',
  precision: 10000
});

lowResolutionClock.start();
- 그냥 객체에서는 context 없이 property를 호출해도 알아서 찾아가지만, class는 field를 호출할 때 무조건 context가 있어야 함!
super의 constructor에서 생성한 empty object가 derived class로 사용되는 것임!
따라서super()에서 선언하는 field들도 모두 derived class의 field로 설정됨(*)에서this.render를 사용하는데 derived class에 선언되지 않았기 때문에 parent에서 찾고,this.render로 호출했으므로 context는 derived class임- constructor을 solution에서는 아래와 같이 썼는데, 다시 객체를 선언하고 집어넣는 이유는 모르겠음:
1
2
3
4
5
  constructor(options) {
    super(options);
    let { precision = 1000 } = options;
    this.precision = precision;
	}
Static properties and methods
class method는 class.prototype에 저장되지만, static으로 선언하면 class 자체에 저장됨:
1
2
3
4
5
6
7
8
9
10
11
12
13
class User {
  static staticMethod() {
    alert(this === User);
  }
}

// same as

class User { }

User.staticMethod = function() {
  alert(this === User);
};
- class의 instance에 저장되는게 아니라, class에 저장되지만 class.prototype처럼 모든 instance들이 static method를 사용할 수 있음
ClassName.method=func;와 같이 클래스 외부에서도 선언 가능
Example
1
2
3
4
5
6
7
8
9
10
11
12
13
14
15
16
17
18
19
class Article {
  constructor(title, date) {
    this.title = title;
    this.date = date;
  }

  static compare(articleA, articleB) {
    return articleA.date - articleB.date;
  }
}

let articles = [
  new Article("HTML", new Date(2019, 1, 1)),
  new Article("CSS", new Date(2019, 0, 1)),
  new Article("JavaScript", new Date(2019, 11, 1))
];

articles.sort(Article.compare);
alert( articles[0].title ); // CSS
Articleobjects을 비교하는Article.compare라는 함수를 만들어야 할 때 static method로 구현Article.compare은 article instance의 method가 아닌,Article클래스의 메소드임
“factory” method도 static method를 사용하는 예시임:
1
2
3
4
5
6
7
8
9
10
11
12
13
class Article {
  constructor(title, date) {
    this.title = title;
    this.date = date;
  }

  static createTodays() {
    return new this("Today's digest", new Date()); // (*)
  }
}

let article = Article.createTodays();
alert( article.title ); // Today's digest
(*)에서this는Article임!!
static method는 database에서 검색, 수정 등을 위해서도 사용될 수 있음:
1
Article.remove({id: 12345});
Article은 article들을 다루는 class임remove와 같은 동작을 static method로 구현할 수 있음
Static properties
static property도 사용 가능함:
1
2
3
4
5
class Article {
  static publisher = "Ilya Kantor";
}

alert( Article.publisher ); // Ilya Kantor
- static method와 마찬가지로
Articleclass 자체에 저장되어있는 property임
Inheritance of static properties and methods
static property와 method도 상속됨:
1
2
3
4
5
6
7
8
9
10
11
12
13
14
15
16
17
18
19
20
21
22
23
24
25
26
27
28
29
30
31
32
33
class Animal {
  static planet = "Earth";

  constructor(name, speed) {
    this.speed = speed;
    this.name = name;
  }

  run(speed = 0) {
    this.speed += speed;
    alert(`${this.name} runs with speed ${this.speed}.`);
  }

  static compare(animalA, animalB) {
    return animalA.speed - animalB.speed;
  }

}

class Rabbit extends Animal {
  hide() {
    alert(`${this.name} hides!`);
  }
}

let rabbits = [
  new Rabbit("White Rabbit", 10),
  new Rabbit("Black Rabbit", 5)
];

rabbits.sort(Rabbit.compare);
rabbits[0].run(); // Black Rabbit runs with speed 5.
alert(Rabbit.planet); // Earth
Rabbit이Animal을 extend하면Rabbit의[[Prototype]]이Animal이 되기 때문에 static method도 상속됨
 |
|---|
| javascript.info 참고 |
1
2
3
4
5
6
7
8
9
10
11
12
13
14
15
따라서, `Rabbit extends Animal`은 두 개의 `[[Prototype]]` reference를 만들어냄
1. `Rabbit` 함수가 `Animal` 함수를 상속받음
2. `Rabbit.prototype`이 `Animal.prototype`을 상속받음

```javascript
class Animal {}
class Rabbit extends Animal {}

// for statics
alert(Rabbit.__proto__ === Animal); // true

// for regular methods
alert(Rabbit.prototype.__proto__ === Animal.prototype); // true
```
=> 기존의 method와 static method 모두 상속됨
Summary
statickeyword를 붙여서 static method/property 선언 가능- class-level data를 다룰 때 사용됨
- static method와 property는 인스턴스가 아닌 클래스 자체에 소속됨
e.g. compare 함수, factory 함수 - static method/property도 상속됨
Tasks
1
2
3
4
5
6
7
8
class Rabbit extends Object {
  constructor(name) {
    this.name = name;
  }
}

let rabbit = new Rabbit("Rab");
alert( rabbit.hasOwnProperty('name') ); // Error
- 생성자에서
super()를 호출해야 함! - 모든 객체들은
Object.prototype을 상속받지만, 이 예제에서는Object를 상속받음
class Rabbit와class Rabbit extends Object도 차이가 있음:
 |
|---|
| javascript.info 참고 |
1
2
e.g. `obj.getOwnPropertyNames`는 `Object.prototype`에 정의되어 있음
=> `class Rabbit`에서는 `Rabbit.getOwnPropertyNames()`로 호출할 수 없지만, `class Rabbit extends Object`에서는 `Rabbit.getOwnPropertyNames()`로 호출 가능
Recap
- 클래스의 instance들은 모두 class.prototype을
[[Prototype]]으로 가져 상속받음- class들은 모두 class.prototype을 가짐
- class method
- class.prototype에 저장됨
모든 instance가 같은 reference- class field
- instance에 저장됨
모든 instance가 다른 reference(object-specific함)- static method/property
- class 함수에 저장됨!
class.prototype이 아님!!
Private and protected properties and methods
OOP에서는 encapsulation이 중요함
Internal and external interface
OOP에서, property와 method는 두 개의 그룹으로 나뉨:
- Internal interface : 클래스 내부의 다른 method로부터 접근 가능한 method, property
- External interface : 클래스 내부와 외부에서 접근 가능한 method, property
external interface를 통해서 internal interface의 기능을 사용할 수 있음
JS에는 두 가지의 object field가 존재함
- public : 어디서든 접근 가능, external interface를 구성함
- private : 클래스 안에서만 접근 가능, internal interface를 구성함
다른 언어들에는 보통 “protected”도 존재함(클래스 내부와 상속받는 클래스들에서 접근 가능)
=> private보다 넓게 사용됨
JS에는 protected가 구현되어있지 않기 때문에 직접 만들어서 사용함
커피머신 클래스를 통해 간단하게 구현해보자
Protecting “waterAmount”
1
2
3
4
5
6
7
8
9
10
11
12
13
class CoffeeMachine {
  waterAmount = 0; // the amount of water inside

  constructor(power) {
    this.power = power;
    alert( `Created a coffee-machine, power: ${power}` );
  }

}

let coffeeMachine = new CoffeeMachine(100);

coffeeMachine.waterAmount = 200;
- 현재는
waterAmount,power가 public임
protected property는 보통 _가 prefix로 붙음:
1
2
3
4
5
6
7
8
9
10
11
12
13
14
15
16
17
18
19
20
21
class CoffeeMachine {
  _waterAmount = 0;

  set waterAmount(value) {
    if (value < 0) {
      value = 0;
    }
    this._waterAmount = value;
  }

  get waterAmount() {
    return this._waterAmount;
  }

  constructor(power) {
    this._power = power;
  }
}

let coffeeMachine = new CoffeeMachine(100);
coffeeMachine.waterAmount = -10; // _waterAmount will become 0, not -10
- accessor property를 사용해서 protected에 접근함
이를 통해서 protected가 음수가 되지 않도록 조절함 _를 붙이는 건 관례일 뿐, 별다른 기능은 없음
Read-only “power”
power property를 처음 값이 설정되고 절대 수정할 수 없게 만들 수도 있음
getter만 만들고 setter를 정의하지 않으면 됨:
1
2
3
4
5
6
7
8
9
10
11
12
13
14
15
class CoffeeMachine {
  // ...
  constructor(power) {
    this._power = power;
  }

  get power() {
    return this._power;
  }
}

let coffeeMachine = new CoffeeMachine(100);
alert(`Power is: ${coffeeMachine.power}W`); // Power is: 100W

coffeeMachine.power = 25; // Error (no setter)
Getter/setter functions
위 예시처럼 getter/setter syntax를 사용해도 되지만,
대부분의 경우get.../set...으로 함수의 이름을 선언해서 사용함:
함수로 정의하면 더 많은 argument를 받을 수 있지만, 코드가 길어짐
Protected fields are inherited
class MegaMachine extends CoffeeMachine과 같이 상속한다면
this._waterAmount나this._power과 같이 상속받은 클래스에서 protected field에 접근 가능함
Private “#waterLimit”
private property, method는 JS에서 지원하는 문법임
private은 #으로 시작해야 하고, 클래스 내부에서만 접근 가능함
Example
1
2
3
4
5
6
7
8
9
10
11
12
13
14
15
16
class CoffeeMachine {
  #waterLimit = 200;

  #fixWaterAmount(value) {
    if (value < 0) return 0;
    if (value > this.#waterLimit) return this.#waterLimit;
  }

  setWaterAmount(value) {
    this.#waterLimit = this.#fixWaterAmount(value);
  }
}

let coffeeMachine = new CoffeeMachine();
coffeeMachine.#fixWaterAmount(123); // Error
coffeeMachine.#waterLimit = 1000; // Error
- private field는 public field와 충돌하지 않음
=>#waterAmount와waterAmount두 property를 동시에 선언 가능함
e.g.1 2 3
get waterAmount() { return this.#waterAmount; }
상속받은 클래스에서 아래와 같이 부모 클래스의 private field를 접근할 수는 없음:
1
2
3
4
5
class MegaCoffeeMachine extends CoffeeMachine {
  method() {
    alert( this.#waterAmount ); // Error: can only access from CoffeeMachine
  }
}
this가MegaCoffeeMachine이기 때문에CoffeeMachine의 private field에는 접근할 수 없음- private는 접근이 너무 제한되기 때문에
CoffeeMachine과 같이 protected가 더 적절한 경우가 많음
Private fields are not available at this[name]
보통this['name']과 같이 field를 호출할 수 있지만, private field에 대해서는this['#name']을 사용할 수 없음
∵ 보안을 위해서 문법이 제한됨
Summary
internal, external interface의 경계를 정하는 것을 encapsulation이라고 함 encapsulation은 아래와 같은 이점이 있음:
- 사용자들이 에러를 스스로 발생시키지 않도록 보호함
사용자들이 프로그램 내부를 조작하는 것을 방지함 - 지원 가능
internal을 엄격하게 구분해놓으면, 외부에 영향을 끼치지 않고 internal interfaces를 수정할 수 있음 -
복잡성 은닉
세부 구현은 숨겨져 있고 심플한 외부 doc만 있는 것이 유지 개발에도 좋음internal interface를 은닉하기 위해서는 protected나 private property를 사용하는게 좋음
- protected field는
_로 시작함
JS에서 protected를 지원하는 것은 아니고, 관례임
get.../set...을 만들어서 수정하게 만듦 - private field는
#으로 시작함
JS에서 private를 지원함
현재는 완전히 지원되지 않고, polyfill해야 함
- protected field는
Extending built-in classes
Array, Map과 같은 내장 클래스들도 확장할 수 있음:
1
2
3
4
5
6
7
8
9
10
11
12
class PowerArray extends Array {
  isEmpty() {
    return this.length === 0;
  }
}

let arr = new PowerArray(1, 2, 5, 10, 50);
alert(arr.isEmpty()); // false

let filteredArr = arr.filter(item => item >= 10);
alert(filteredArr); // 10, 50
alert(filteredArr.isEmpty()); // false
filter,map과 같은 내장 메소드들은 상속받은 클래스인PowerArray객체를 리턴함
이를 위해서 객체의constructorproperty를 사용함
e.g.arr.constructor === PowerArray임arr.filter()가 호출되면,Array가 아닌,arr.constructor가 사용되어 새로운 배열이 생성됨
=>PowerArray의 method를 계속 사용할 수 있음
static getter Symbol.species를 이용해서 이 동작을 임의로 수정할 수도 있음
Symbol.species는 map, filter과 같은 내장 method에서 반환할 객체의 생성자를 반환해야 함:
1
2
3
4
5
6
7
8
9
10
11
12
13
14
15
class PowerArray extends Array {
  isEmpty() {
    return this.length === 0;
  }

  static get [Symbol.species]() {
    return Array;
  }
}

let arr = new PowerArray(1, 2, 5, 10, 50);
alert(arr.isEmpty()); // false

let filteredArr = arr.filter(item => item >= 10);
alert(filteredArr.isEmpty()); // Error: filteredArr.isEmpty is not a function
- 위 예시에서는
PowerArray대신Array를 반환하기 위해Symbol.species가Array를 반환함
=>filteredArr은Array이기 때문에PowerArray의 method인isEmpty()를 사용할 수 없음
다른 collection들도 비슷하게 작동함
Map,Set과 같은 collection들도Symbol.species를 사용함
No static inheritance in built-ins
내장 객체들도 static method를 가짐
e.g. Object.keys, Array.isArray
native class는 서로 확장함
e.g. Array extends Object
보통 한 클래스가 다른 하나를 확장하면, static, non-static method 모두 상속됨
하지만, 내장 클래스는 예외임!
static method는 상속되지 않음
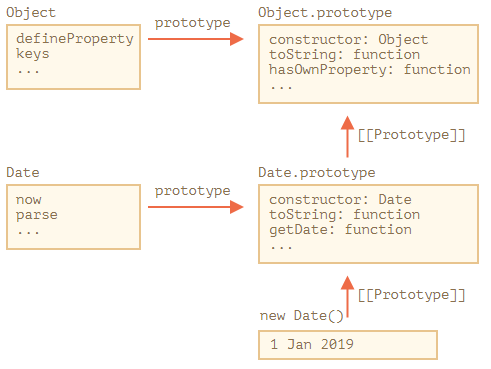
e.g. Array와 Date는 Object를 상속받기 때문에, 이 클래스들의 instance들은 Object.prototype의 method들을 상속받음
하지만 Array.[[Prototype]]은 Object를 가리키기 않음!!
=> Array.keys()같이 Object 안에 있는 static method를 사용할 수 없음!
 |
|---|
| javascript.info 참고 |
Date.prototype만Object.prototype을 확장함!
extends를 사용했을 때와 객체로 상속할 때의 가장 큰 차이점임!
class는 object를 만들기 위한 template임
class를 이용해서 만든 인스턴스가 객체임
Summary
| code | description |
|---|---|
static get [Symbol.species](){return Class;} |
메소드에서 새로운 객체를 리턴해야 할 때 Class의 생성자를 사용하게 함 |
-
Array,Map과 같은 내장 클래스도 확장할 수 있음
이때, 이 클래스들의 메소드 중 새로운 객체를 리턴하는 메소드들은Array.constructor가 아닌 현재 클래스의arr.constructor를 사용함static getter
Symbol.species를 수정해서 이 동작을 변경할 수도 있음:1 2 3 4 5 6 7 8 9
class PowerArray extends Array { isEmpty() { return this.length === 0; } static get [Symbol.species]() { return Array; } }
-
PowerArray에서filter와 같은 메소드를 호출하면Array.constructor가 반환됨
Map,Set도Symbol.species를 선언할 수 있음 -
내장 클래스는 확장하면 static method가 상속되지 않음!
∵ prototype끼리는 상속받지만, 클래스끼리는[[Prototype]]으로 연결되지 않음__proto__로 상속할 때와extends를 이용할 때의 차이점임
Class checking: “instanceof”
instanceof operator를 사용해서 object가 특정 class에 속하는지 알 수 있음
상속받고 있는지도 확인해줌
The instanceof operator
1
2
3
4
5
6
7
8
9
10
11
12
13
14
15
16
17
18
obj instanceof Class

/*-------------example--------------*/
// (1)
class Rabbit {}
let rabbit = new Rabbit();

alert( rabbit instanceof Rabbit ); // true

// (2)
function Rabbit() {}

alert( new Rabbit() instanceof Rabbit ); // true

// (3)
let arr = [1, 2, 3];
alert( arr instanceof Array ); // true
alert( arr instanceof Object ); // true
// (3)에서arr->Array->Object로 확장함
instanceof는 prototype chain을 확인해서 객체가 특정 클래스에 속하는지 확인하지만, static method인 Symbol.hasInstance를 사용해서 판단 기준을 바꿀 수도 있음
obj instanceof Class는 아래와 같이 동작함:
-
Symbol.hasInstance가 존재하면Class[Symbol.hasInstance](obj)를 호출함
이 메소드는true/false를 리턴해야 함e.g.
1
2
3
4
5
6
7
8
9
 class Animal {
   static [Symbol.hasInstance](obj) {
     if (obj.canEat) return true;
   }
 }

 let obj = { canEat: true };

 alert(obj instanceof Animal); // true: Animal[Symbol.hasInstance](obj) is called
-
Symbol.hasInstance가 없는 경우Class.prototype이obj의 prototype chain 중에 존재하는지 확인1 2 3 4
obj.__proto__ === Class.prototype? obj.__proto__.__proto__ === Class.prototype? obj.__proto__.__proto__.__proto__ === Class.prototype? ...
위 조건들 중 하나라도 참이면
true를 반환e.g.
1
2
3
4
5
6
7
8
 class Animal {}
 class Rabbit extends Animal {}

 let rabbit = new Rabbit();
 alert(rabbit instanceof Animal); // true

 // rabbit.__proto__ === Rabbit.prototype
 // rabbit.__proto__.__proto__ === Animal.prototype (match!)
 |
|---|
| javascript.info 참고 |
objA.isPrototypeOf(objB) method도 존재함
objA가 objB의 prototype chain의 어딘가에 존재하면 true를 반환함
=> obj instanceof Class는 Class.prototype.isPrototypeOf(obj)와 같음
하지만 Class.prototype.isPrototypeOf(obj)는 Class의 생성자는 제외하고 포함 여부를 확인하는 것에 주의!
prototype chain과 Class.prototype만 확인함
따라서 아래와 같이 prototype이 바뀌었을 때 예상치 못한 결과가 나올 수 있음:
1
2
3
4
5
6
7
function Rabbit() {}
let rabbit = new Rabbit();

Rabbit.prototype = {};

// ...not a rabbit any more!
alert( rabbit instanceof Rabbit ); // false
Bonus: Object.prototype.toString for the type
plain object는 toString으로 인해 [object Object]로 변환됨:
1
2
3
4
let obj = {};

alert(obj); // [object Object]
alert(obj.toString()); // the same
toString은 이 기능 이외에도typeof를 확장한 것이나instanceof의 대체재로 사용될 수 있음
specification에 따르면, 내장toString은 객체에서 빌려서 다른 context에서 실행될 수 있음
결과 값은 아래와 같이 계산됨:- context가
Number일 경우[object Number]리턴 - context가
Boolean일 경우[object Boolean]리턴 - context가
null일 경우[object Null]리턴 - context가
undefined일 경우[object Undefined]리턴 - context가
Array일 경우[object Array]리턴 - 기타 customize 가능
1
2
3
4
5
6
7
  let s = Object.prototype.toString;

  let arr = [];
  alert( s.call(arr) ); // [object Array]
  alert( s.call(123) ); // [object Number]
  alert( s.call(null) ); // [object Null]
  alert( s.call(alert) ); // [object Function]
call을 사용해서this=arr인 context에서objectToString실행함
내부적으로,toString은this를 조사하고 알맞은 결과를 리턴함
- context가
Symbol.toStringTag
toString은 Symbol.toStringTag를 통해서 변경할 수 있음:
1
2
3
4
5
6
7
8
9
10
11
let user = {
  [Symbol.toStringTag]: "User"
};

alert( {}.toString.call(user) ); // [object User]

alert( window[Symbol.toStringTag]); // Window
alert( XMLHttpRequest.prototype[Symbol.toStringTag] ); // XMLHttpRequest

alert( {}.toString.call(window) ); // [object Window]
alert( {}.toString.call(new XMLHttpRequest()) ); // [object XMLHttpRequest]
- 대부분의 객체들은 이 property를 가짐
- 변환된 결과는
[object ...]에Symbol.toStringTag의 값이 들어간 것임 - 따라서
[Symbol.toStringTag]property를 선언한 뒤,{}.toString.call을instanceof대신 사용해서 typeof와 같은 역할을 하게 만들 수 있음
Summary
| code | description |
|---|---|
objA instanceof Class |
objA가 Class의 인스턴스인지 판별 |
static [Symbol.hasInstance](obj){...} |
obj가 조건을 충족시키면 현재 클래스의 인스턴스로 인정해, instanceof obj가 true를 리턴하도록 만듦 |
objB.isPrototypeOf(objA) |
objB가 objA의 prototpye chain에 존재하는지 판별objA instanceof Class는 Class.prototype.isPrototypeOf(objA)와 같음 |
[Symbol.toStringTag] |
toString의 결과값 [object Object]에서 Object 대신 들어갈 문자열을 저장하는 property |
obj instanceof Classoperator의 동작 과정Symbol.hasInstance가 존재하면 그것을 따름obj의 prototype chain에Class.prototype이 존재하는지 확인
instanceof는 상속 구조를 조사할 때 유용함- prototype을 지우면
instanceof를 사용했을 때 예상하지 못한 결과가 발생할 수 있음!
∵instanceof가 prototype chain을 이용해서 결과를 계산하기 때문 [Symbol.hasInstance](obj)는 static method임[Symbol.toStringTag]는 property임
Tasks
1
2
3
4
5
6
7
8
function A() {}
function B() {}

A.prototype = B.prototype = {};

let a = new A();

alert( a instanceof B ); // true
A.prototype,B.prototype모두{}를 레퍼런스로 가지기 때문에,a.__proto__ === B.prototype이라a instanceof B가true가 됨!
Mixins
JS에서 상속받을 수 있는 객체의 개수는 하나임
[[Prototype]]으로 상속받기 때문
클래스도 하나의 클래스만 확장할 수 있음
이런 특징은 두 개의 클래스를 상속받아야 하는 상황에서 걸림돌이 됨
이때 mixin을 사용하면 됨
mixin은 다른 클래스가 mixin을 상속받지 않아도 mixin의 메소드를 사용 가능하게 해주는 클래스임
즉, mixin은 method를 제공하지만, 그 메소드는 mixin에서 바로 사용되지 않고 다른 클래스들에서 사용됨
A mixin example
JS에서 mixin을 만드는 가장 간단한 방법은 method를 가진 object를 만들고 다른 클래스의 prototype과 합치는 것임:
1
2
3
4
5
6
7
8
9
10
11
12
13
14
15
16
17
18
19
// mixin
let sayHiMixin = {
  sayHi() {
    alert(`Hello ${this.name}`);
  },
  sayBye() {
    alert(`Bye ${this.name}`);
  }
};

// usage:
class User {
  constructor(name) {
    this.name = name;
  }
}

Object.assign(User.prototype, sayHiMixin);
new User("Dude").sayHi(); // Hello Dude!
- 상속 관계가 아닌, 메소드를 복사하는 것뿐이기 때문에 다른 클래스를 상속받을 수 있음:
1
2
3
4
5
  class User extends Person {
    // ...
  }

  Object.assign(User.prototype, sayHiMixin);
mixin도 다른 mixin을 상속받을 수 있음:
1
2
3
4
5
6
7
8
9
10
11
12
13
14
15
16
17
18
19
20
21
22
23
24
25
26
27
28
29
let sayMixin = {
  say(phrase) {
    alert(phrase);
  }
};

let sayHiMixin = {
  __proto__: sayMixin, // (or we could use Object.setPrototypeOf to set the prototype here)

  sayHi() {
    // call parent method
    super.say(`Hello ${this.name}`); // (*)
  },
  sayBye() {
    super.say(`Bye ${this.name}`); // (*)
  }
};

class User {
  constructor(name) {
    this.name = name;
  }
}

// copy the methods
Object.assign(User.prototype, sayHiMixin);

// now User can say hi
new User("Dude").sayHi(); // Hello Dude!
- parent method를 호출할 때는
super.say()와 같이super를 사용해야 함!!
외부에서sayHiMixin.say()로 호출하면 부모까지 메소드를 찾아가지만, 클래스 안에서 호출하면 현재 context에서만 찾는 듯 super.say()는sayMixin의 prototype인sayMixin에서 메소드를 찾음-
diagram:
| |
| :—————————————————————————————–: |
| javascript.info 참고 |
|
| :—————————————————————————————–: |
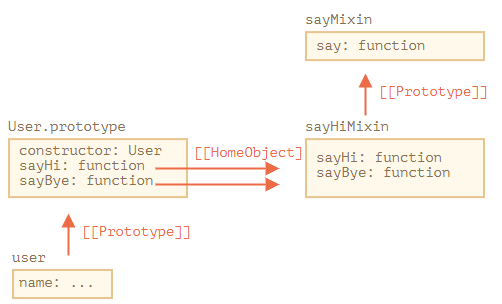
| javascript.info 참고 |sayHi,sayBye는sayHiMixin에서 생성되었기 때문에User.prototype으로 복사되었다 하더라도[[HomeObject]]에는sayHiMixin이 들어있기 때문에super.say()가 제대로 동작함
∵super는[[HomeObject]].[[Prototype]]을 찾음
EventMixin
이벤트와 관련된 함수를 제공하는 mixin을 만들어보자:
.trigger(name, [...data]):nameevent를 발생시킴
name의 모든 listener가 호출됨.on(name, handler): handler를name이벤트의 listener로 추가함
name이벤트가 일어났을 때.trigger에서 생성된handler를 인자로 받아서 호출됨.off(name, handler):handlerlistener를 삭제함
1
2
3
4
5
6
7
8
9
10
11
12
13
14
15
16
17
18
19
20
21
22
23
24
25
26
27
28
29
30
31
32
33
34
35
36
37
38
39
40
let eventMixin = {
  /**
   * Subscribe to event, usage:
   *  menu.on('select', function(item) { ... }
  */
  on(eventName, handler) {
    if (!this._eventHandlers) this._eventHandlers = {};
    if (!this._eventHandlers[eventName]) {
      this._eventHandlers[eventName] = [];
    }
    this._eventHandlers[eventName].push(handler);
  },

  /**
   * Cancel the subscription, usage:
   *  menu.off('select', handler)
   */
  off(eventName, handler) {
    let handlers = this._eventHandlers?.[eventName];
    if (!handlers) return;
    for (let i = 0; i < handlers.length; i++) {
      if (handlers[i] === handler) {
        handlers.splice(i--, 1);
      }
    }
  },

  /**
   * Generate an event with the given name and data
   *  this.trigger('select', data1, data2);
   */
  trigger(eventName, ...args) {
    if (!this._eventHandlers?.[eventName]) {
      return; // no handlers for that event name
    }

    // call the handlers
    this._eventHandlers[eventName].forEach(handler => handler.apply(this, args));
  }
};
.on(eventName, handler):handler를this._eventHandlers[eventName]에 추가함.off(eventName, handler):handler를this._eventHandlers[eventName]에서 삭제함.trigger(eventName, ...args):this._eventHandlers[eventName]에 있는 모든 handler들을 호출함
Usage
1
2
3
4
5
6
7
8
9
10
11
12
13
14
class Menu {
  choose(value) {
    this.trigger("select", value);
  }
}
Object.assign(Menu.prototype, eventMixin);

let menu = new Menu();

menu.on("select", value => alert(`Value selected: ${value}`));

// triggers the event => the handler above runs and shows:
// Value selected: 123
menu.choose("123");
- event handler라고 따로 JS에서 지원하는 기능이 있는게 아니고 그냥 method 이름인듯
단지 mixin으로trigger,on,offmethod를 추가해줘서 event 별로 listener를 추가해서 실행시키는 것임
inheritance chain을 건드리지 않고 event handling을 할 수 있게 해주기 때문에 mixin을 사용하는 듯
Summary
- Mixin
- OOP에서 사용되는 용어임
- 다른 클래스들을 위한 메소드를 포함한 클래스임
- 다중 상속을 허용하는 언어도 존재하지만, JS는 허용하지 않기 때문에 mixin으로 한 객체의 prototype에 메소드를 추가해야 함
- event-handling이 mixin을 사용하는 대표적인 예시임
.trigger(name, ...args),.on(name, handler),.off(name, handler)메소드를 제공함
- 기존에 존재하는 메소드와 이름이 같을 수도 있기 때문에 mixin에 사용되는 메소드들의 이름 규약을 정하는게 좋음

Leave a comment