
JSnote3: Code quality
Code quality
Debugging in Chrome
Debugging : process of finding and fixing errors within a script
The “Sources” panel
File navigator, code editor, JavaScript debugging pane이 존재
Console
Esc를 누르면 console창이 열림
Breakpoints
line number를 클릭해서 설정 가능함
Breakpoints panel에서 breakpoint들을 확인 가능함
※ line number를 오른쪽 클릭해서 conditional breakpoint를 설정 가능함(지정한 조건이 만족할 때만 멈춤)
Debugger command
debugger; statement를 script에 넣어서 breakpoint를 만들 수도 있음
=> browser을 킬 필요 없이 code editor에서 바로 중단점 설정 가능
Pause and look around
Debugging pane의 탭에서 여러 가지 정보를 확인 가능
- Watch 탭 : expression의 현재 값을 보여줌
- Call Stack 탭 : 호출 스택을 보여줌
- 가장 밑에는 script가 있는 파일이 anonymous로 있음
- Scope 탭 : 변수들을 scope로 분류해서 보여줌
Tracing the execution
- Resume
- hotkey :
F8 - 실행을 재개함
- hotkey :
- Step
- hotkey :
F9 - 다음 statement 하나를 실행함
- hotkey :
- Step over
- hotkey :
F10 - 다음 statement 하나를 실행하지만, 그게 직접 정의한 함수의 호출이면 넘김
- hotkey :
- Step into
- hotkey :
F11 - Step은 async action을 무시하지만 step into는 asynchronous function call도 고려해서 비동기적인 함수가 호출되면 그 함수의 코드를 차례대로 실행함(interrupt를 허용하는 느낌)
- hotkey :
- Step out
- hotkey :
Shift + F11 - 현재 함수의 끝까지 실행함
- hotkey :
※ Continue to here을 이용하면 바로 원하는 줄로 갈 수 있음
Logging
console.log 함수를 이용해서 값의 변화를 볼 수 있음
console이 열려있어야 출력됨
Example
1
2
3
for (let i = 0; i < 5; i++) {
  console.log("value,", i);
}
- console에
"value,", 0이런 형태로 한 줄씩 출력됨
Summary
script를 멈추는 3가지 주요 방법:
- breakpoint
debuggerstatement- error(dev tool이 열려있고 automatic pause가 활성화되어 있어야 함)
Coding Style
Syntax
JS는 indentation으로 space 2개를 사용
Curly Braces
“Egyptian” style을 주로 사용함({는 같은 줄, }는 다른 줄
Line Length
`은 string에 줄바꿈을 허용함
최대 줄 길이를 정해놓는게 좋음(80 - 120 글자 정도)
Indents
Horizontal indents : 2 or 4 spaces
Semicolons
Nesting Levels
nesting을 너무 많이 하지 않는게 좋음(continue나 return등을 사용해서)
Function Placement
보통 코드를 먼저 쓰고 함수 정의를 나중에 쓰는 경우가 많음
(∵ 함수가 어떤 역할인지 알면 읽을 필요가 없기 때문)
Style Guides
- Google JS Style Guide
- Airbnb JS Style Guide
- Idiomatic.JS
- StandardJS
등의 style guides가 존재함
Automated Linters
- JSLint
- JSHint
- ESLint
등의 Linter가 존재
code style 뿐만 아니라 오타도 찾아줌
대부분 editor와 함께 통합되어 있음
Node.js에서 ESLint를 설치하는 방법:
- Node.js 설치
npm install -g eslint로 ESLint 설치.eslintrc파일을 JS project root에 생성- plugin 허용
.eslintrc의 예시:
1
2
3
4
5
6
7
8
9
10
11
12
{
  "extends": "eslint:recommended",
  "env": {
    "browser": true,
    "node": true,
    "es6": true
  },
  "rules": {
    "no-console": 0,
    "indent": 2
  }
}
extends로 기본적으로 따를 설정을 정하고 밑에 직접 정의
Comments
Bad comments
코드의 작동 방식을 설명함
만약 코드가 불분명하고 주석이 필요하다면 다시 쓰는게 나을 수도 있음
Recipe: factor out functions
한 기능을 하는 코드를 함수로 대체
Recipe: create functions
코드가 길다면 함수로 대체
위와 같은 방법들은 함수 이름으로 기능을 파악하고 바로 다음 부분으로 넘어가게 해주기 때문에 코드의 가독성을 높여줌
Good comments
Describe the architecture
어떻게 코드가 서로 상호작용하는지, control flow가 어떻게 흘러가는지 등을 UML을 이용해서 제공
Document function parameters and usage
JSDoc이라는 syntax를 이용해서 주석으로 함수의 용도, 인자, 리턴값을 문서화할 수 있음
위와 같은 방법들은 함수의 목적과, 코드를 보지 않고 알맞게 사용하는 방법을 제공함
WebStorm, JSDoc3등에 이런 기능이 있음
Why is the task solved this way?
어떤 문제가 (특히 가장 명확한 방법이 아닌) 특정한 방법으로 풀렸을 때 주석을 제공해야 함
Any subtle features of the code? Where they are used?
Summary
Comment this:
- Overall architecture, high-level view
- Function usage
- Important solutions, especially when not immediately obvious
Avoid comments
- That tell “how code works” and “what it does”
- Put them in only if it’s impossible to make the code so simple and self-descriptive that it doesn’t require them
Ninja code
프로젝트에서는 숏코딩, 변수 재사용 등 금지
Automated testing with Mocha
Why do we need tests?
직접 돌려가면서 테스트를 하면, 인자가 다르게 들어왔을 때 잘못된 결과가 나오게 고치는 등의 실수를 할 수 있음
자동화된 테스트는 코드와 별도로 테스트 케이스들을 작성하고 테스트해서 예상 결과와 비교함
Behavior Driven Development(BDD)
BDD : tests AND documentation AND examples
BDD를 이해하기 위해 실제 개발 사례를 살펴보자
Development of “pow”: the spec
n>=0이라 가정하고 x를 n제곱한 결과를 리턴하는 pow(x, n) 함수를 만든다고 가정해보자.
함수를 구현하기 전에 이 함수의 기능을 정의하고 표현해야 함
=> specification(명세서)으로 함수의 개요와 사용 방법을 제공할 수 있음:
1
2
3
4
5
6
7
describe("pow", function() {

  it("raises to n-th power", function() {
    assert.equal(pow(2, 3), 8);
  });

});
describe("title", function() { ... })구현하려는 기능에 대한 설명을 넣음
it여러 개가 들어갈 수도 있기 때문에 function expression을 사용함it("use case description", function() { ... })title에는 사용 방법을 자연어로 적음
두 번째에는 use case test함수를 넣음assert.equal(value1, value2)assert.*함수는pow가 예상대로 동작하는지 확인해줌
위 예시에서는assert.equal을 사용함
=> 두 값이 일치하는지 비교, 그렇지 않으면 에러를 출력
※ specification은 실행할 수 있음
The development flow
- An initial spec is written, with tests for the most basic functionality
- An initial implementation is created
- To check whether it works, we run the testing framework Mocha that runs the spec. While the functionality is not complete, errors are displayed. We make corrections until everything works
- We add more use cases to the spec, probably not yet supported by the implementations. Tests start to fail
- Go to 3, update the implementation till tests give no errors
- Repeat steps 3-5 till the functionality is ready
The spec in action
pow 함수의 initial spec와 JS libraries를 이용해서 spec을 실행해보자
아래의 라이브러리들을 사용할 예정:
- Mocha : core framework,
describe,it등의 함수 제공 - Chai : assertion에 관한 라이브러리
- Sinon : a library to spy over functions
위 라이브러리들은 in-browser과 server-side 모두에서 사용 가능함
Example
The full HTML page with these frameworks and pow spec:
1
2
3
4
5
6
7
8
9
10
11
12
13
14
15
16
17
18
19
20
21
22
23
24
25
26
27
28
29
30
31
32
33
34
35
36
37
38
39
<!DOCTYPE html>
<html>
<head>
  <!-- add mocha css, to show results -->
  <link rel="stylesheet" href="https://cdnjs.cloudflare.com/ajax/libs/mocha/3.2.0/mocha.css">
  <!-- add mocha framework code -->
  <script src="https://cdnjs.cloudflare.com/ajax/libs/mocha/3.2.0/mocha.js"></script>
  <script>
    mocha.setup('bdd'); // minimal setup
  </script>
  <!-- add chai -->
  <script src="https://cdnjs.cloudflare.com/ajax/libs/chai/3.5.0/chai.js"></script>
  <script>
    // chai has a lot of stuff, let's make assert global
    let assert = chai.assert;
  </script>
</head>

<body>

  <script>
    function pow(x, n) {
      /* function code is to be written, empty now */
    }
  </script>

  <!-- the script with tests (describe, it...) -->
  <script src="test.js"></script>

  <!-- the element with id="mocha" will contain test results -->
  <div id="mocha"></div>

  <!-- run tests! -->
  <script>
    mocha.run();
  </script>
</body>

</html>
| Result: |
|---|
 |
let assert=chai.assert;로 chai의 assert 함수들을 사용.mochadiv에 테스트 결과가 표시됨- 지금은
pow()가 구현되지 않은 상태이기 때문에 에러가 출력됨
Initial implementation
pow 함수를 아래와 같이 구현:
1
2
3
function pow(x, n) {
  return 8; // :) we cheat!
}
| Result: |
|---|
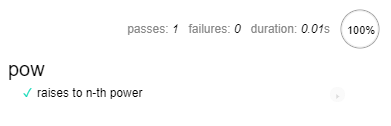 |
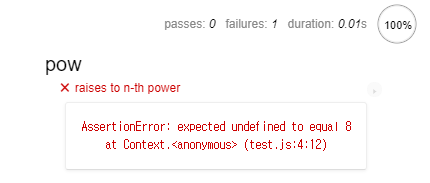
it의 ㅕㅕit함수의 두 번째 인자를 볼 수 있음
Improving the spec
spec에 test를 추가하는 두 가지 방법:
- 같은
itblock에 추가 - test case를 추가함1 2 3 4 5 6 7 8
describe("pow", function() { it("raises to n-th power", function() { assert.equal(pow(2, 3), 8); assert.equal(pow(3, 4), 81); }); });
| Result: |
| :————————————————————————————————————– |
|  |
|
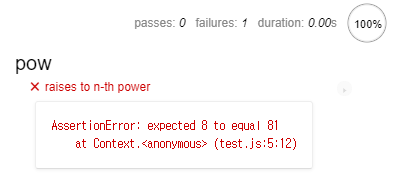
itblock을 추가 - test를 하나 더 만듦1 2 3 4 5 6 7 8 9 10 11
describe("pow", function() { it("2 raised to power 3 is 8", function() { assert.equal(pow(2, 3), 8); }); it("3 raised to power 4 is 81", function() { assert.equal(pow(3, 4), 81); }); });
| Result: |
|---|
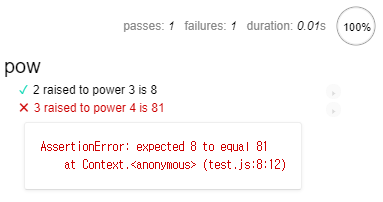 |
두 방법의 가장 큰 차이점 : assert가 에러를 발생시키는 시점
=> 첫 번째 방법은 첫 번째 assert가 에러나면 두 번째 assert는 아예 실행되지가 않아서 결과를 알 수 없음
따라서 두 번째 방법을 사용하는 것이 나음
(+ 하나의 test에는 하나만 체크하는게 좋음)
Improving the implementation
pow를 아래와 같이 구현:
1
2
3
4
5
6
7
8
9
function pow(x, n) {
  let result = 1;

  for (let i = 0; i < n; i++) {
    result *= x;
  }

  return result;
}
it를 자동으로 생성되게 구현:
1
2
3
4
5
6
7
8
9
10
11
12
13
14
describe("pow", function() {

  function makeTest(x) {
    let expected = x * x * x;
    it(`${x} in the power 3 is ${expected}`, function() {
      assert.equal(pow(x, 3), expected);
    });
  }

  for (let x = 1; x <= 5; x++) {
    makeTest(x);
  }

});
| Result: |
|---|
 |
Nested describe
it를 추가해서 test 안에 test case를 추가할 수 있지만, 아예 describe를 중첩해서 test를 추가할 수도 있음:
1
2
3
4
5
6
7
8
9
10
11
12
13
14
15
16
17
18
19
describe("pow", function() {

  describe("raises x to power 3", function() {

    function makeTest(x) {
      let expected = x * x * x;
      it(`${x} in the power 3 is ${expected}`, function() {
        assert.equal(pow(x, 3), expected);
      });
    }

    for (let x = 1; x <= 5; x++) {
      makeTest(x);
    }

  });

  // ... more tests to follow here, both describe and it can be added
});
| Result: |
|---|
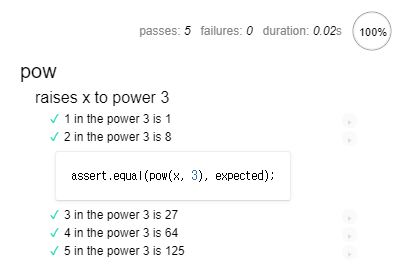 |
before, after, beforeEach, afterEach를 이용해서 it 실행 전/후로 실행될 내용을 정의 가능:
1
2
3
4
5
6
7
8
9
10
11
12
describe("test", function() {

  before(() => alert("Testing started – before all tests"));
  after(() => alert("Testing finished – after all tests"));

  beforeEach(() => alert("Before a test – enter a test"));
  afterEach(() => alert("After a test – exit a test"));

  it('test 1', () => alert(1));
  it('test 2', () => alert(2));

});
Result:
1
2
3
4
5
6
7
8
Testing started – before all tests (before)
Before a test – enter a test (beforeEach)
1
After a test – exit a test   (afterEach)
Before a test – enter a test (beforeEach)
2
After a test – exit a test   (afterEach)
Testing finished – after all tests (after)
- 카운터를 0으로 설정하는 것과 같이 테스트 사이에 초기화를 할 때도 사용됨
Extending the spec
pow(x, n)은 n이 양수라 가정하기 때문에 이외의 값이 들어오면 NaN이 출력되도록 먼저 spec을 확장:
1
2
3
4
5
6
7
8
9
10
11
12
13
describe("pow", function() {

  // ...

  it("for negative n the result is NaN", function() {
    assert.isNaN(pow(2, -1));
  });

  it("for non-integer n the result is NaN", function() {
    assert.isNaN(pow(2, 1.5));
  });

});
| Result: |
|---|
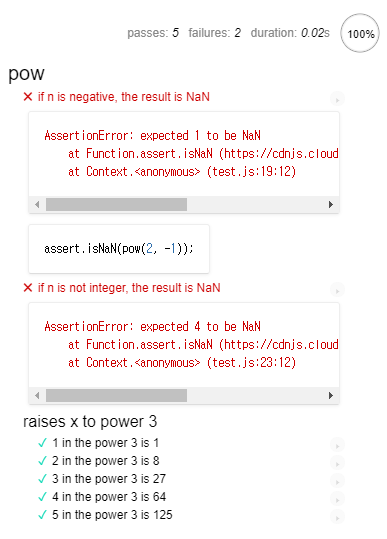 |
- JS에서는 보통 에러를
NaN으로 표현 - 현재는 n이 양수일 경우만 구현하고 예외처리를 하지 않았기 때문에 테스트가 실패함(
NaN리턴하지 않음)
Other assertions
assert.isNaN(value): checks thatvalue === NaNassert.equal(value1, value2): checks the equalityvalue1 == value2assert.strictEqual(value1, value2): checks the strict equalityvalue1 === value2assert.notEqual,assert.notStrictEqual: inverse checks to the ones aboveassert.isTrue(value): checks thatvalue === trueassert.isFalse(value): checks thatvalue === false
pow에 예외처리를 위해 아래 코드를 추가:
1
2
  if (n < 0) return NaN;
  if (Math.round(n) != n) return NaN;
| Result: |
|---|
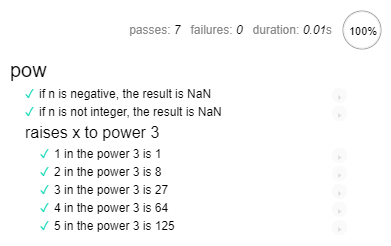 |
Summary
BDD에 따르면, spec을 먼저 작성하고 난 다음에 기능을 구현함
spec은 3가지 용도로 사용될 수 있음:
- As Tests
- As Docs
- As Examples
well-tested code has better architecture
(∵ 함수의 기능, 입력, 출력을 정의한 다음 구현하기 때문)
Tasks
it는 iteration의 약자라고 생각하면 될 듯(하나의 it에 하나의 테스트 케이스만)
it.only()를 사용하면 sibling인 it가 있어도 it.only()만 실행함
Polyfills and transpilers
JS에서 새로운 제안이 가치있다고 판단되면 ecma 리스트에 추가되고 specification으로 처리됨
최신의 코드가 오래된 엔진에서 돌아가게 하기 위해서 Transpilers, Polyfills를 사용함
Transpilers
modern code를 parse하고 결과가 같도록 older syntax로 다시 써주는 프로그램
e.g. 2020년 이전에는 ??가 존재하지 않았기 때문에 바꿈
보통 transpiler를 돌린 코드를 서버로 deploy함
Babel이 인기있는 transpiler임
webpack같은 modern project build system에서 ‘provide’가 transpiler을 자동으로 돌리는 옵션임
Polyfills
Math.trunc(n)과 같이 새로운 내장 함수가 추가되기도 하는데, 오래된 JS engine에서는 이런 새로 추가된 내장 함수가 지원되지 않기 때문에 에러가 남
문법이 바뀐게 아니기 때문에 transpile할 수 없고 아예 새로 선언해야 함
=> 새로운 기능을 업데이트하거나 추가해주는 script를 polyfill이라고 함
(It “fills in” the gap and adds missing implementation)
if(!Math.trunc)와 같이 함수가 있는지 판별 가능
JS에서는 built-in function도 수정이 가능함
polyfill을 지원하는 libraries:
- core js
- polyfill.io
※ Chrome이 대부분 최신 기능을 가장 먼저 지원함

Leave a comment